Let's connect!
Molly B Duncan Health Coach
  • Home
  • About
  • Health Coaching
    • FAQ's
    • Testimonials
  • Classes
  • Blog
  • Contact
  • FAVORITES

Roasted Green Beans & Chickpeas with Fig Vinaigrette

8/15/2016

0 Comments

 
Picture

The Monday before last, I boarded a Southwest flight from Sacramento to Burbank armed with two pounds of fresh figs and two jars of homemade fig jam thanks to my friend Emily.  You may have noticed it is fig season.  Brian and I welcome it with banners and open arms and a ticker tape parade, such is our adoration and obsession with figs.

Emily and I have been friends for 32 years, having met in elementary school.  We haven't lived in the same town since we were twelve.  In fact, this year is the first time in 23 years that we are living in the same state.  I went up for the weekend to celebrate her sister's baby shower and to meet a friend's newborn.  It was a glorious weekend of good friends and good food.  If you follow me on Instagram, you'll know it is also where I learned to saber a bottle of sparkling wine.  

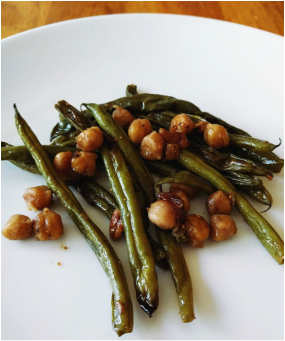
That good food included a roasted bean salad with a plum marmalade vinaigrette at a restaurant in Sebastopol.  It was so good I couldn't stop thinking about it.  Usually, I am fretting about where my next meal is coming from.  In this case, I was fretting about when I could eat this glorious combination of beans, chickpeas and toasted pecans again.  Within a week of arriving home, I recreated the salad which I am so happy to share with you!  One of the best parts of the salad is the vinaigrette which I made using Emily's homemade fig preserves.  Whoa yum!

If you have ever disliked green beans or think the only way to prepare them is to open a can of them and drown them in Ranch dressing, try this recipe.  You won't be disappointed!

Roasted Green Beans & Chickpeas in Fig Vinaigrette
Serves 4-5

1 pound green beans, washed and trimmed
1 15.5-ounce can of chickpeas (garbanzo beans), drained and rinsed
2 tablespoons extra virgin olive oil
1/2 teaspoon freshly ground black pepper
1 teaspoon sea salt (or Kosher)
1/4 cup chopped pecans, toasted
2 tablespoons fig preserves (apricot, plum, or apple jams/jellies are all fine substitutes)*
1 tablespoon good quality balsamic vinegar (use apple cider vinegar if you are using apricot or apple preserves)
1 1/2 tablespoons extra virgin olive oil

*Look for something with low to no added sugar or sweetened only with fruit juice.  Do not use any jams or jellies that contain sugar substitutes as it will ruin the flavor of the dish.  
​

Preheat oven to 425 F.

In a large bowl, toss together the green beans, chickpeas, olive oil, salt and pepper.  Spread the beans on a rimmed half sheet pan (also called a large jelly roll pan - 16.75 x 12 inch).  You may need to use two baking sheets.  Roast in the oven for 20 minutes.

In the meantime, make the fig vinaigrette.  Whisk together the preserves and the vinegar.  While whisking, slowly add the olive oil.  Set aside.

After the beans have roasted for 20 minutes, pull the pan out of the oven.  Sprinkle the pecans over the beans and roast an additional 5 minutes.

When the beans have finished roasting, remove them from the oven and place the bean mixture in a large bowl.  Pour the fig vinaigrette over it and toss to coat.  Serve immediately.

​Nutritional awesomeness:  Green beans are a very good source of fiber, vitamins A & C plus K, folate, and manganese.  Folate is instrumental in DNA repair.  Chickpeas (garbanzo beans) are also a good source of folate and manganese as well as Vitamin B6.  Manganese supports bone health and collagen production.

0 Comments

4 Ways Oil Pulling is Good For You

8/4/2016

0 Comments

 
Picture
  
Most mornings I rinse my mouth out with oil.  Let me say it again: I rinse my mouth with oil.  It's the fourth thing I do after awaking and is preceded by snuggling with Brian, petting my dog, and removing my mouthguard.  I do it for my health.  I've been doing it for years now.  

As it is beyond habit into a full blown lifestyle practice, I don't think about it much.  Or at least I didn't until I attended a yoga retreat this past weekend with a sub-theme of Ayurveda running through it.  Ayurveda is the sister science of yoga.  In Sanskrit, it means the knowledge (veda) of life (ayur).  It is the healing and thriving modality of India incorporating so much more than a medical system.  It is thousands of years ancient.  I won't go much into it beyond that because I could dedicate this whole blog to Ayurveda and never run out of content.

As its history is closely related to the history of yoga, I studied it a bit in my yoga teacher trainings, and it keeps coming back to me, knocking on the door, and providing guidance, especially when Western medicine just shoves a pill at me and tells me it's in my head.  Ayurveda does not ask about symptoms, it asks how is your constitution?  Is something out of balance?  Are you moving through the world respecting the seasons, the elements, and your body's own rhythms?  

Oil pulling is an Ayurvedic practice.  Traditionally, it is done with sesame oil (though the oil that is right for you depends on your constitution).  Before I have swallowed anything, while the accumulated bacteria from sleeping is still festering in mouth, I sip and swish a tablespoon of organic unrefined expeller pressed sesame oil created by unicorns (I might be exaggerating about the unicorns). It whirls around my mouth like a vacuum picking up the unwanted bacteria.    Scroll down for instructions and tips for oil pulling.

When I first told my dental technician I was doing this, she was very skeptical.  When I returned six months later for a scheduled cleaning, she confessed I inspired her to read about oil pulling and its benefits.  

Benefits of Oil Pulling:
  1. ​It's good for the whole body.  Not only are you detoxifying your mouth when you do this, but because you are cleaning the area of the body where most germs enter, you are preventing future illnesses.  As someone who is thriving with autoimmune disease, I'm up for anything that keeps me from getting sick!
  2. It boosts your pearly whites.  That's right, oil pulling has been shown to whiten teeth.
  3. It's good for your skin because you are removing bacteria that causes rashes and inflammation of our largest organ.  Many people report improved skin health when committing to a regular oil pulling practice.
  4. Improves oral health.  It reduces gingivitis and tooth decay, improves gums, and can reduce cavities.
(Sources for benefits of oil pulling can be found here and here)

I have a health coaching client who practiced oil pulling as part of the health practices she created in my coaching program.  After a few months of oil pulling, she went to the dentist, an appointment she always hated, and it said it was the best dental exam of her entire life!

If you are interested in trying it for yourself, let's get started.

Step by Step Instructions for Oil  Pulling:
  1. Choose your oil and store it in a cool dark place.  Sesame is traditional for Ayurveda.  You cannot go wrong with either sesame, coconut, or olive oil that is organic, virgin, and cold pressed.  Coconut oil is very trendy right now, and it has anti-viral properties.  As it is solid at room temperature and the other oils are not, I found that it triggered my very sensitive gag reflex.  Do with this information what you will.  
  2. It must be done first thing in the morning so the oil is most effective in capturing the accumulated bacteria in the mouth.  To successfully incorporate it into your morning routine, insert it after something you already do like going to bathroom, getting out of bed, etc.  Don't swallow or drink water before oil pulling.  
  3. Place approximately one tablespoon of your chosen oil in your mouth and proceed to swish it around for upwards of five minutes without swallowing it.  The more you move it around the entirety of your mouth, the more nasty unwanted gunk you'll remove.  The oil becomes viscous and opaque as you do this.
  4. Spit it out.  Do not, under any circumstances, spit it out in your sink.  This is a recipe for a clogged sink.  I've found it fine to spit it out in the toilet mostly because I am using sesame oil which is liquid at room temperature.  Other people recommend spitting it out in a trash can lined with a sturdy, non-porous trash bag.
  5. Brush your teeth using your toothpaste of choice with a toothbrush specifically to be used for oil pulling.  In other words, have two toothbrushes, one for regular use, and one for using after oil pulling.  Why?  Even though you just oil pulled, there will be some residual bacteria contaminated oil in your mouth and it may end up on the toothbrush.  Net, you don't want to be brushing your teeth at night and reinserting bacteria you removed in the morning.  Also, you'll want to clean your oil pulling toothbrush regularly.
  6. Feel your awesome clean teeth with your tongue, give yourself a high five, and go share your smile with the world (it needs that smile, dammit!).  
I would love to hear from you!  Have you tried oil pulling?  Why or why not?  Post your feedback in the Comments below.

0 Comments

    Author

    Hi friends!  I am Molly.  Welcome to my blog where I share my creations and adventures to help you create a life you love.  I am passionate about food, travel, and health! Thanks for stopping by and looking around.  All photos are taken by me unless otherwise attributed.  I develop and write all my recipes with attribution for inspiration and ideas where applicable.  All of my recipes are gluten free.  

    Archives

    August 2021
    June 2021
    April 2021
    March 2021
    December 2020
    November 2020
    October 2020
    June 2020
    May 2020
    April 2020
    February 2020
    January 2020
    December 2019
    September 2019
    August 2019
    July 2019
    May 2019
    April 2019
    March 2019
    February 2019
    January 2019
    November 2018
    October 2018
    September 2018
    August 2018
    July 2018
    June 2018
    May 2018
    April 2018
    February 2018
    January 2018
    December 2017
    October 2017
    September 2017
    August 2017
    July 2017
    June 2017
    May 2017
    April 2017
    March 2017
    February 2017
    September 2016
    August 2016
    July 2016
    June 2016
    May 2016
    April 2016
    March 2016
    February 2016
    January 2016
    December 2015
    November 2015
    October 2015
    September 2015
    August 2015
    July 2015
    June 2015
    May 2015
    April 2015
    March 2015
    February 2015
    January 2015

    Categories

    All
    Breakfast
    Dessert
    Dinner
    Exercise & Fitness
    Gluten Free
    Healthy Living
    Healthy Snacks
    Healthy Travel
    Quick
    Recipes
    Side Dishes
    Skin Care
    Sugar Addiction
    Vegan
    Web Wellness Wednesdays
    Women's Health

    RSS Feed

    Subscribe to our mailing list

    * indicates required
    Your data is used in line with our privacy policy.
Health Coaching
Classes
Contact
FAQ
Terms and Conditions
​Disclaimer
Privacy Policy
© COPYRIGHT Molly B Duncan.
​ ALL RIGHTS RESERVED.
Photos used under Creative Commons from Brett Jordan, roseannadana