Let's connect!
Molly B Duncan Health Coach
  • Home
  • About
  • Health Coaching
    • FAQ's
    • Testimonials
  • Classes
  • Blog
  • Contact
  • FAVORITES

A Delicious, Nutritious Two-Ingredient Snack

4/18/2018

0 Comments

 
Picture

My current favorite snack is just two ingredients: dates and cashew butter.  That's it.  I discovered it in January when I chose to temporarily eliminate some foods from my diet so that my body could feel better.  Sure I enjoyed the sugar-laden desserts of the holidays and too much wine.  But between the overindulgence of the holidays and recovering from my second miscarriage, which happened in November, by January my body was asking, no it was begging for a break. 

I don't diet.  I don't cleanse or detox.  I do try to eat in a way that helps me thrive while living with an autoimmune disease.  I was diagnosed with Grave's Disease in February 1998.  For twenty years I have managed to live with one disease without developing another.  Research has shown that once you develop one autoimmune disease, you are much more likely to develop another.  One doctor told me I was 600 times more likely than someone who does not have autoimmunity.  

So in January, I eliminated some inflammatory foods, giving my body a chance to heal.  Out went dairy and alcohol and soy and legumes and sugar.   I am a snacker by nature and snacks were a real challenge until I happened upon this flavorful and nutritious combination of dates smeared with cashew butter.  The sweetness of the dates plus the creaminess of the cashew butter is incredibly delicious and incredibly satisfying.

Can I call this a recipe?  It feels more like a method so here is the method for this snack followed by the nutritional awesomeness it provides.

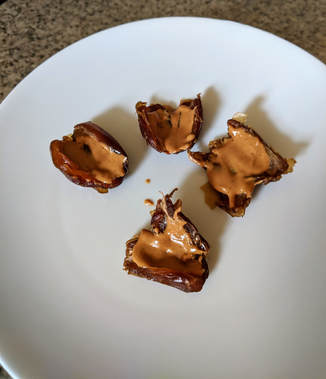
Dates with Cashew Butter
Serves 1

2 Medjool dates or 3 smaller dates such as Bahri or Deglet Noor
Cashew Butter

Remove the pit from the date and spread it flat.  Smear it with cashew butter.  Yum!

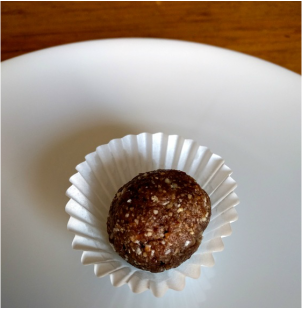
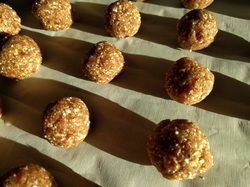
If you like dates, check out my recipe for date balls.  

Nutritional awesomeness:  Dates are loaded with anti-oxidants and other good for you vitamins and minerals, are considered low glycemic, and have a reputation for being the Viagra of Saudi Arabia (ahem and bada bing bada boom!).  If you want more information about the health benefits of dates, check out this article, and this one, and also this one.  The fat in cashew butter aids digestion.  You can read about the benefits of cashew butter here.  

​You can learn more about dates in this article.  

It's your turn!  What are some of your favorite two ingredient snacks?

0 Comments

How to Make Yogurt 101

3/15/2017

0 Comments

 
Picture
Picture

A couple of weeks ago I taught my very popular sugar addiction class, "Sugar Blues" where for 90 minutes I turn on a fire hose of information about how sugar feeds cancer cells, causes mental health issues, and is more addictive than cocaine. In class, we examine hidden sugars found in supposedly healthy foods.  One culprit is yogurt.  The American Heart Association recommends for women no more than 100-150 of your daily calories from added sugars.  One gram of sugar is 4 calories so that's 25 grams of sugar per day.  Americans, on average, consume over 100 grams of sugar per day.  That's four times the recommended amount!!!!! In class, I handed one of the students an empty organic lemon-flavored non-fat yogurt.  She gasped as she read it has 20 grams of sugar in it.  That's almost all of your recommended daily sugar intake in one seemingly innocent container of 8-ounce yogurt.  

Brian, also known as dear darling husband, started making his own yogurt last fall.  He calculated that even with the purchase of a yogurt maker, a quart of milk is much cheaper than a quart of yogurt.  He eats yogurt with overnight oats almost every morning for breakfast.  That's a lot of yogurt.  He also figured that if he started making his own yogurt, he could achieve better flavor, and that has been true.  Brian agreed to share his recipe, which he says is more of a method.  As a bonus, he threw in a Q&A section at the bottom to answer the most common questions he receives when people discover he makes his own yogurt.

By the way, this post is not intended to make you feel bad if you don't want to tackle making your own yogurt.  Instead, let it inspire you to check for hidden sugars in your food.  It's amazing how often it lurks in food labeled "natural" or "healthy," both terms largely unregulated by the Food & Drug Administration.  

How to Make Yogurt 101  by Brian Johnson
Scroll down past the Method to find a gallery of useful photos followed by Frequently Asked Questions about making homemade yogurt.  
​
​What you need
: 
  • One quart of milk not ultra-pasteurized
  • Yogurt to use as starter 
  • Yogurt maker (such as Euro Cuisine YM80)
  • Medium saucepan with lid or double boiler
  • 1.75-quart (7-cup) glass bowl with lid (like this one)
  • Immersion thermometer 
  • Quarter-cup measure 
  • Small whisk 
  • Vodka 

Method: 
  1. Attach immersion thermometer to saucepan or double boiler.  End of thermometer should be about a half-inch above the bottom of the pan.  

  2. Pour one quart of milk into saucepan with immersion thermometer attached.  

  3. Place saucepan over low heat, place cover on as well as you can with the thermometer attached to the saucepan, and warm to 180-190 degrees.  If your stove is too hot, the milk will form a crust on the bottom of the pan, so keep it low.  It will take some time to heat to 180-190 degrees.  Be patient.  

  4. When the milk reaches 180-190 degrees, turn off heat, remove cover, and allow to cool to 110 degrees.  This will take quite a while.  Again, be patient.  Go walk your dog, take a shower, have a glass of wine, or whatever you need to do, but do not stand there watching the thermometer.  If it goes below 110 because you had a second glass of wine, that's okay.  

  5. While your milk is cooling, pour a small amount of vodka (about an ounce or two) into a small bowl or saucer.  Wet a paper towel in the vodka and wipe your glass bowl, your quarter-cup measure, and your whisk with it to sterilize them.  

  6. You can mix the remaining vodka 1:2 with tonic water and have a nice vodka & tonic while waiting for your milk to cool.  Or just pour it out.  

  7. When the milk has reached 110 degrees, pour it into the glass bowl, add 1/4 cup of yogurt, and whisk thoroughly.  

  8. Place milk-yogurt mixture (without the lid on the glass bowl) into your yogurt maker, place the cover on the yogurt maker, turn it on, and leave for about eight hours or so.  I find it works well to start the process before bed, leave it overnight, and I have finished yogurt when I wake up in the morning.  

  9. After incubating for eight hours or so, remove from yogurt maker, place lid on glass bowl, and place in fridge to cool.  
  10. Next time you make yogurt, you can use this batch as a starter.  You never have to buy yogurt again!  


​Frequently Asked Questions: 
Q:  Why can't I use ultra-pasteurized milk?  
A:  Ultra-pasteurized milk has preservatives which will kill the yogurt culture.  

Q:  What if I don't heat the milk before making my yogurt? 
A:  Heating the milk does two things:  (1) It sterilizes the milk so that there are no "bad" bacteria competing with the yogurt culture, and (2) It modifies the proteins in the milk so that your yogurt will be nice and thick, instead of thin and runny.  

Q:  What if I don't cool the milk before adding my yogurt starter? 
A:  If it's too hot, you'll kill the yogurt culture.  

Q:  What yogurt do you recommend starting with? 
A:  My favorite is Stonyfield Organic.  This is purely personal preference.  

Q:  Can I really never buy yogurt again?  Never? 
A:  Yes, if you can manage not to let your yogurt sit too long in the fridge and spoil, you can keep using your homemade yogurt as starter for each new batch forever.
0 Comments

10-Minute Mango Frozen Yogurt

6/16/2016

0 Comments

 
Picture
Hello summer.  A heat wave is coming.  It will be so hot we've cancelled our plans to go camping.  It's too hot to camp.  Thoughts turn to cold, frozen, icy, cool, and anything that distracts from the heat that is coming.  It's too hot to go outside.  It's too hot to go to the store.  I want something cold and delicious and refreshing.  Don't you?  You know you do!  

This super easy and quick frozen yogurt is what you want.  You likely have all the ingredients on hand:  yogurt, frozen fruit, sugar, and lemons or limes.  The only equipment you need is a food processor.  In 10 minutes or less, cold and creamy satisfaction can be yours.

This recipe was inspired by one published in Food & Wine magazine a decade ago. Created by Ferran Adria using strawberries, I've played with it a bit as the original had too much sugar for my liking and not enough acid.  I present the mango version here.  Scroll to the end of this post for the Strawberry Frozen Yogurt variation.  

10-Minute Mango Frozen Yogurt
Makes 3-4 cups

1 pound frozen mango chunks, broken up if clumped together
5 ounces whole fat yogurt (Greek is fine), unsweetened
1/4 cup sugar (I prefer organic cane sugar)​
One lime, cut into wedges

Equipment:  7-cup capacity food processor (or larger)

Set up your food processor with the blade attachment.  Into the processor bowl add the mango chunks, yogurt, and sugar.  Process for two minutes.  Scrape down sides and stir around any chunks that have clumped together or are not broken down.  Process until smooth.  May require up to five minutes of processing.  

Serve immediately with lime wedges.  Encourage eaters to squeeze fresh lime over the frozen yogurt to added a much needed and quite enjoyable zing!

Store in an airtight container in the freezer for up to three days.  Though, it won't be as good as when it is first made.  

In progress.
Smooth and ready.
Let's eat!
Strawberry Variation:
Substitute one pound of frozen strawberries for the frozen mango chunks.  Instead of lime wedges, cut one lemon into wedges to be squeezed over the Strawberry Frozen Yogurt.  
0 Comments

"I thought it was cookie dough!"

4/28/2016

1 Comment

 
Picture

I was sitting at a neighborhood block party across from a tatted dude who was munching on one of my balls.  He was really enjoying it so I decided that was a good time to tell him that the dessert I brought was raw, vegan, and Paleo.  "Really," he said, his mouth full of sweet, salty goodness, "I thought it was cookie dough!"  No, I don't follow any of those eating regimens.  I just know a good recipe when I find one.  And this one is so good!  I've had a lot of social gatherings lately where I either wanted to share love through food or was tasked with bringing a dessert.  Either way, these balls, nicknamed Debs by my cousin (date energy balls) deliver!  They are immensely satisfying, especially for your sweet tooth despite having no added sugar.  It's a treat you can feel good about eating and giving to your kids and sharing with your friends!  And dear goodness are they easy to make.  Do I hear a hallelujah?!

So there are lots of recipes on the web for date balls and such.  However, some were too salty.  Others had way too much coconut oil in them (my hands were very soft after rolling those).  This recipe represents my happy medium.  It has enough salt to create the cookie dough effect without making you desert thirsty.  There's enough coconut oil to bind them together without creating a mess or an unpleasant mouthfeel.  

Just know there are some variations and is some room to play here and have fun.  You could roll them in cacao.  You could embed a high quality very dark chocolate chip in the middle as a delicious (and full of antioxidants) surprise.  You could coat them in unsweetened toasted coconut.  

Picture
Little Debs
Makes 24-27 balls of goodness

2 cups whole Medjool dates, not pitted (available at Trader Joe's and sometimes Costco)
2 cups pecan pieces (or almonds or walnuts)
1 cup unsweetened shredded coconut (you can find an organic version at Trader Joe's)
1 tablespoon + 2 teaspoons organic virgin coconut oil
1 teaspoon vanilla extract (check the label to make sure it's gluten free)
3/4 teaspoon fine sea salt

Equipment:  7-cup capacity or larger food processor, baking sheet (that you can put in the freezer)

This is where I tell you to measure the whole dates in a two cup liquid measuring cup (like this one).  Normally, you would never measure a dry ingredient in a liquid cup, but in this case it led to the best outcome in recipe testing.  It can be slightly above the 2-cup line.  Then pit the dates and remove the small disk at the top of the date that is not good eats.   Set aside.

Fit your food processor with the S-blade.  Add the pecans and coconut to the food processor.  Pulse in 10 second bursts until they are fine crumbs but not nut butter.  Add the remaining ingredients and process until a sticky dough forms. Transfer the dough into a bowl as it's easier to work from a bowl than the food processor itself.

Line a baking sheet with parchment paper.  Using a tablespoon, place a heaping scoop of dough in your hand.  Roll into a ball and place on the baking sheet.  Repeat until you have used all the dough.  You'll have five rows of five balls or six rows of four balls, etc.

If you are going to coat the balls in cacao or coconut, do that now before the next step.​

Create a flat space in your freezer, and freeze the balls for one hour.  From here, I like to put the balls in candy wrappers, and store either in the refrigerator or in the freezer.   They'll keep in the fridge for up to one week or in your freezer for one month.  

Nutritional awesomeness:  ​Dates are loaded with anti-oxidants and other good for you vitamins and minerals, are considered low glycemic, and have a reputation for being the Viagra of Saudi Arabia (ahem and bada bing bada boom!).  If you want more information about the health benefits of dates, check out this article, and this one, and also this one.  Coconut is an excellent source of manganese.  Coconut oil is anti-viral and raises your good cholesterol (HDL).  However, use in moderation because it can also raise your bad cholesterol (LDL).  

1 Comment

    Author

    Hi friends!  I am Molly.  Welcome to my blog where I share my creations and adventures to help you create a life you love.  I am passionate about food, travel, and health! Thanks for stopping by and looking around.  All photos are taken by me unless otherwise attributed.  I develop and write all my recipes with attribution for inspiration and ideas where applicable.  All of my recipes are gluten free.  

    Archives

    August 2021
    June 2021
    April 2021
    March 2021
    December 2020
    November 2020
    October 2020
    June 2020
    May 2020
    April 2020
    February 2020
    January 2020
    December 2019
    September 2019
    August 2019
    July 2019
    May 2019
    April 2019
    March 2019
    February 2019
    January 2019
    November 2018
    October 2018
    September 2018
    August 2018
    July 2018
    June 2018
    May 2018
    April 2018
    February 2018
    January 2018
    December 2017
    October 2017
    September 2017
    August 2017
    July 2017
    June 2017
    May 2017
    April 2017
    March 2017
    February 2017
    September 2016
    August 2016
    July 2016
    June 2016
    May 2016
    April 2016
    March 2016
    February 2016
    January 2016
    December 2015
    November 2015
    October 2015
    September 2015
    August 2015
    July 2015
    June 2015
    May 2015
    April 2015
    March 2015
    February 2015
    January 2015

    Categories

    All
    Breakfast
    Dessert
    Dinner
    Exercise & Fitness
    Gluten Free
    Healthy Living
    Healthy Snacks
    Healthy Travel
    Quick
    Recipes
    Side Dishes
    Skin Care
    Sugar Addiction
    Vegan
    Web Wellness Wednesdays
    Women's Health

    RSS Feed

    Subscribe to our mailing list

    * indicates required
    Your data is used in line with our privacy policy.
Health Coaching
Classes
Contact
FAQ
Terms and Conditions
​Disclaimer
Privacy Policy
© COPYRIGHT Molly B Duncan.
​ ALL RIGHTS RESERVED.
Photos used under Creative Commons from Brett Jordan, roseannadana