Let's connect!
Molly B Duncan Health Coach
  • Home
  • About
  • Health Coaching
    • FAQ's
    • Testimonials
  • Classes
  • Blog
  • Contact
  • FAVORITES

Gluten-Free Cornbread Stuffing

12/17/2020

0 Comments

 
Picture

I cried during Thanksgiving dinner.  Those who know me well will not find this terribly unusual.  I really feel all my feelings.  But this year, I cried over stuffing, and not because it was bad.  I cried because it was so, so good!  And also because when I went gluten free in 2013 I thought my days of eating stuffing at Thanksgiving dinner were over.  I hadn't eaten stuffing in nearly a decade.  To be truthful, rarely do Brian and I make a traditional meal at Thanksgiving.  We've eaten paella, various roasts, and last year we enjoyed a butternut squash lasagna.  The lasagna was so rich we are still recovering from it!  The stuffing I made for Thanksgiving was not made from gluten free bread because frankly so much of gluten free bread resembles styrofoam peanuts that have been pulverized and are being held together by air only to crumble when you take a bite.  Here we have a benefit of moving to the South: cornbread!  Many cornbread recipes call for a combination of cornmeal and wheat flour.  Traditionally, though, cornbread was made with just cornmeal.  And we happen to have locally milled cornmeal.  This stuffing requires you to make traditional cornbread one day and then the stuffing the next day.  It's worth it, and honestly, it's pretty easy.  The most difficult part is planning your time.

NOTE: Bake the cornbread the day before you plan to make the stuffing.

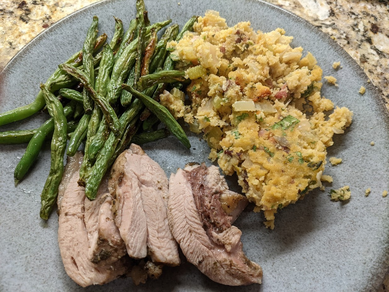
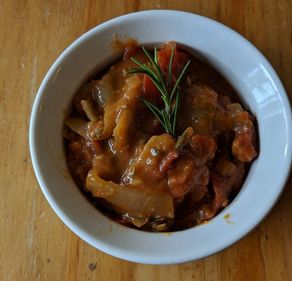
Gluten Free Cornbread Stuffing
Serves 6-8 

Cornbread:
1 1/2 cups cornmeal
1 teaspoon salt
1/2 teaspoon baking soda
1 large egg
1 cup buttermilk
1/4 cup high quality grapeseed or canola oil

Stuffing:
1 8-inch square pan of baked cornbread (using above recipe)
2-3 tablespoons of extra virgin olive oil
1 large yellow onion, not sweet, peeled and chopped
5 stalks of celery, with leaves on if you can find it this way, chopped
1 4-ounce package of diced pancetta, optional
2 tablespoons fresh or 1 1/2 tablespoons dried thyme leaves
4-5 fresh sage leaves, finely chopped, or 1 teaspoon (or more) dried sage
1 teaspoon sea salt or kosher salt
1 teaspoon (or more to taste) freshly ground black pepper
2 cups unsalted chicken broth (bonus points for you if it's homemade)
2 eggs, beaten
1/3-1/2 cup fresh Italian parsley, finely chopped
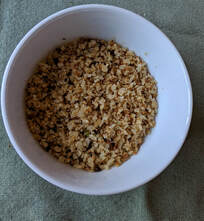
1 cup toasted pecan pieces, optional
  1. Make the cornbread.  Preheat the oven to 400 F.  Grease an 8-inch square baking pan.  In a large bowl, whisk together all the dry ingredients.  In a smaller bowl or wide-mouth pitcher, whisk together the wet ingredients.  Pour the wet ingredients into the dry and stir until well combined.  Pour into the greased baking pan.  Bake for 20-25 minutes until it is golden brown and starting to pull away from the sides of the pan.  Let cool in the pan.  Cover and let sit overnight.
  2. Make the stuffing.  Preheat your oven to 375 F.  Grease a 9x13 baking pan.  Heat a large skillet over medium heat.  Add the olive oil and swirl it around.  Add the onions, celery, and, if using it, the pancetta.  Cook until the onions are translucent, stirring often.  Once the vegetables have softened, add the thyme, sage, salt and black pepper.  Cook for another two minutes.  Turn off the heat and let the vegetables cool a bit.
  3. While the vegetables are cooling, crumble the cornbread into a large bowl.  Stir in the stock, eggs, parsley, and, if using them, the pecans.  Place the stuffing into your greased 9x13 pan.  Bake for 30-33 minutes, until it's light golden brown on top and starting to brown around the edges.  Let cool for 5 minutes and serve.  
Make it vegetarian: omit the pancetta and use vegetable broth instead of chicken broth.  

0 Comments

Easy Recipes for Thanksgiving

11/19/2020

1 Comment

 
Picture
A pan of broccoli about to be roasted.
Like a lot of Americans we are having a very small Thanksgiving celebration this year with just my husband and me and two dogs.  We can't bring ourselves to have anything bigger or to travel when it feels like that would be so disrespectful to the health care workers who are on the front lines of this pandemic. I've been reading their stories, and it's all so heartbreaking.  Also, we don't want to get sick and we don't want to die. 

I have some Thanksgiving recipes to share with you to help make your holiday delicious.  I loathe difficult recipes, especially ones with hard to find ingredients that use every pan and utensil in my kitchen so the recipes shared here are easy!

If a whole turkey will be way too much food for you this year, consider turkey thighs.  We'll be having this as our main course!  Also, we had it as our main course last year!  

If turkey does not excite you or you just don't feel like having it, I invite you to consider serving an easy roast chicken with root vegetables.  Even if you don't have this for Thanksgiving, save this recipe for winter because it's satisfying during the cold months.  

Let's talk about side dishes.  By far and away, the best side dish recipe I have developed over the years is this one: Roasted Green Beans with Chickpeas and Fig Vinaigrette.  It has great crunch from pecans, it has both tart and sweet notes from the vinaigrette, and, frankly, it's lick-the-plate good.  If chickpeas don't interest you, just omit them.  

My friend Kathryn reminded me the other day that my husband, Brian, makes the best Roasted Broccoli.  It's another easy and delicious recipe that deserves space on your holiday table.  

How about soup?  A lovely way to start your Thanksgiving meal would be with this Pumpkin Soup, which I created after sampling many delicious versions on a trip to Italy some years ago.  It's Italian so it must be good!

Since Thanksgiving foods tend to be rich, a salad to cut through the fat and cleanse the palette is recommended.  It's the beginning of citrus and avocado season so this Avocado & Grapefruit Salad is appropriate.  

While all the recipes mentioned above have been personally developed by me, there are a couple of holiday standards we have on the table every year.  I always make the Barefoot Contessa's Cranberry Conserve which is loaded with citrus, nuts, and apples.  I modify her recipe to make it the best cranberry sauce ever!  It has an obscene amount of sugar in the original recipe, 1 3/4 cups of sugar.  I reduce it to one cup of sugar, and it turns out sweet enough without feeling like you are having dessert in the middle of dinner.  

For Thanksgiving dessert last year, I made a pumpkin cheesecake, and, honestly, I regret it, save for the bourbon pecan caramel sauce.  It took so much time.  Plus the water bath failed so there I was blow drying a soggy cheesecake.  We haven't quite settled on a dessert for our holiday meal this year.  I am lobbying heavily for this Pumpkin Cake with cream cheese frosting.  

Wherever you are this year and however you choose to celebrate, I hope we will all do the right thing and celebrate Thanksgiving only with immediate family.  It's a small sacrifice to make to ensure that we can be with our families next year during the holidays.  
​

1 Comment

Roasted Cauliflower Rice

4/17/2019

0 Comments

 
Picture

"What do you do to keep the riced cauliflower from tasting like a slightly solid form of boiled water?"  This is a message from my friend Marci after she read my recipe for Spring Vegetable Mishmash.  I've been swapping out cauliflower rice for regular rice recently as I have evidence that consuming rice too often has led to some recent autoimmune flare-ups.  Cauliflower rice is also popular with people who follow a Whole30 or a Paleo diet or an autoimmune protocol.   I definitely feel better after eating cauliflower rice versus eating traditional rice.  

However, Marci's question brought up a good point and that is cauliflower rice can sometimes taste like just a bunch of wet styrofoam pebbles.  Frankly, food should taste good, especially healthy food.  Through trial and error, I have found that roasting cauliflower rice produces the most flavor.  It's an easy cooking method and takes as much or less time to make as traditional rice.  

Here are the ingredients for it, if you are not starting with a whole head of cauliflower, plus what it looks like spread in the pan:

Picture
Picture
Roasted Cauliflower Rice
Serves 3-4

One large head of cauliflower or 16-ounces of riced cauliflower
2 Tablespoons of grapeseed oil, avocado oil, or coconut oil (melted)

Preheat your oven to 425 F.  Brush a baking sheet with the oil.  

If you are using a whole head of cauliflower, wash it, cut off the lower stem and all leaves.  Cut it into eight parts. Place in the bowl of a food processor with the blade attachment. Pulse 10 times for 5-10 seconds until the cauliflower is reduced to very small chunks.  

Spread the cauliflower on the prepared baking sheet.  Bake for 10 minutes. Remove from the oven.  Stir the cauliflower so the bits browning on the edges are well incorporated back into the middle.  Spread so the cauliflower is evenly distributed.  Bake for another 10 minutes or so until some of the cauliflower is becoming golden brown. You’ll notice that roasting the cauliflower rice has caused it to shrink.  

Use as a base for any dish that calls for rice.  

Nutritional awesomeness: A half cup of cooked cauliflower is an excellent source of Vitamin C, even after accounting for Vitamin C loss during the cooking process (source).  For a better understanding of how the cooking process can alter the nutrient content of fruits and vegetables click here.
0 Comments

Tomato Provençal Compote

6/28/2018

4 Comments

 
Picture
I recently taught my last cooking class for the foreseeable future.   The Get Saucy class came about because I noticed my friends and family commenting on the sauces we make at home and how complicated they seemed.  The thing is, sauces can be so easy and are such a great way to bump up the flavor of anything from roasted vegetables to grilled chicken.   Here's what I know to be true for me: cooking at home is a great way to control what you eat and support your health and vitality.  Sauces are an integral part of home cooking.  To me, there are two sauce methods.  One method is the "beat the heck out of it" method.  Pesto falls into this category.  Just put all the ingredients into the food processor and beat the heck of out it (apologies to Italian grandmothers who use a mortal and pestle).  The other method is the "cook the heck out of it" method.  Tomato Provençal Compote falls into this category.  While it takes a while to cook, the preparation is easy, and, therefore, it feels accessible to everyone, no matter your level of cooking ability.  

This recipe is inspired by a Barefoot Contessa recipe for roasted lamb.  We made it once when Brian's parents were visiting for Christmas and everyone raved about how the tomatoes that were roasted with the lamb disintegrated into a magical concoction that had me licking my plate in front of my in-laws.  Perhaps not my proudest moment, and I love to eat.  

As I have lots of friends who are vegan and vegetarian and wanted to share the sauce with them, I created my own recipe for Tomato Provençal Compote that anyone can enjoy.  And as it is summer and tomato season is upon us, now is the time to enjoy this delicious recipe, which can be served cold or warm, with meats or veggies or on bread.  It's not bad eaten with a large spoon right out of the container standing in front of an open fridge!

​Molly’s Tomato Provençal Compote
Makes ~ 1 pint or a little more

¼ cup of extra virgin olive oil
1 large Spanish onion, sliced
2 pounds of fresh tomatoes, seeded and diced
5 cloves of garlic, peeled and chopped
3 Tablespoons of Dijon mustard
1 ½ Tablespoons of balsamic vinegar
½ teaspoon of honey
Leaves from two to three sprigs of thyme
Leaves from one sprig of rosemary
Salt and freshly ground pepper to taste

Heat the olive oil in a large saucepan (at least 3 quart saucepan).  Add the onions and saute over medium heat until they are starting to turn light brown.  While the onions cook, chop the thyme and rosemary leaves together. In a bowl, combine the garlic, mustard, vinegar, honey, and chopped herbs.

When the onions start to change color, add the tomatoes, a couple of pinches of salt and a couple of cracks of black pepper.  If anything is sticking to the bottom of the pan, deglaze it with one tablespoon or two of water, and then add another drizzle of olive oil.  Stir the tomatoes and onions a bit. When the tomatoes are starting to break down, add the mustard herb mixture and stir to combine. Continue to cook over medium low heat for 15 minutes.  If there’s still a lot of liquid in the pan, turn up the heat to evaporate it while stirring to keep the compote from sticking to the bottom of the pan. The compote should be fairly thick, like a stew.  Season with salt and pepper to taste and serve.

Storage:  Can be stored up to one week in the refrigerator or frozen for up to three months.

Serving ideas:  Excellent with grilled meats, served over white beans, slathered on grilled toast, or eaten out of the jar with a spoon.

​Nutritional awesomeness:  Cooked tomatoes are an excellent source of Vitamin C and a good source of Vitamin A.  They have a low glycemic load.  

4 Comments

Roasted Snow Peas with Maple Soy Glaze

2/27/2018

0 Comments

 
Picture

Roasted Snow Peas.  Perhaps you are already roasting your snow peas, but we certainly were not.  Historically, when snow peas were on the menu, Brian would haul out his beloved wok and stir fry them which is a quick cooking method with a not so quick clean-up method. 

So the other night when both of us arrived home tired, one from sailing and the other from working, we wanted a quick dinner.  We had salmon fillets in the freezer and snow peas in the fridge so the menu was easy.  We would do the Maple Soy Salmon recipe from Julia Turshen's wonderfully useful cookbook Small Victories.  Brian would stir fry the snow peas.  Add our usual green salad and two glasses of wine and there's dinner.

Except I didn't want to stir fry the snow peas.  I just wanted to throw everything in the oven.  We always have leftover glaze from the Maple Soy Salmon recipe so I suggested that we toss the snow peas with the leftover glaze and roast them in the oven at the same time as the salmon.  One cooking method.  No standing over a hot stove.  Easy clean up of two sheet pans.  YES!

And it turns out that roasted snow peas are delicious!  And quick!  And easy! And nutritious!

Roasted Snow Peas with Maple Soy Glaze
Serves 4

1 lb. snow peas, cleaned with ends trimmed
1 Tablespoon low-sodium soy sauce or gluten free tamari
1 Tablespoon pure maple syrup (feel free to omit)
1 Tablespoon extra virgin olive oil
1/2 to 1 teaspoon ground ginger, depending on your preference.
Salt and pepper to taste

Preheat oven to 425 F.  

Toss all the ingredients together and spread evenly on a sheet pan (13 x 18 inches).  Roast for 12-14 minutes, rotating the pan 180 degrees halfway through cooking.  Serve hot or cold or room temperature as they are delicious at any temperature.  Sprinkle with salt and pepper to taste.  Pairs especially well with roasted salmon. 

Nutritional awesomeness:  Snow peas have got a lot of goodness.  They are a good source of Vitamin A and Vitamin K.  As Vitamins A and K are fat soluble vitamins, the olive oil in the recipe helps your body absorb them.

0 Comments

Sauteed Zucchini with White Beans and Onions

6/29/2017

4 Comments

 
Picture
Photo by Brian Johnson.
I recently taught one of my favorite cooking classes, Meal Planning for Health & Vitality.    I had a terrific group of students who asked lots of good questions.   Many of these students reminded me that sometimes the most challenging part of the meal is being creative with vegetables.   As my mother-in-law likes to say, "I'd be a vegetarian if preparing vegetables were not so much work."  

My goal is to change the misconception that creatively preparing vegetables has to be a lot of work to produce a lot of flavor.  I actively avoid recipes with too many ingredients or that require the use of every pan in the house plus some kitchen tools you don't have and didn't know exist.  I don't do precious when it comes to my food.   I do do good flavor with quick and easy preparations that can easily fit into our busy lifestyles.  

I'd like to introduce you to my new favorite side dish, or, some nights when I am teaching yoga and arrive home late, dinner.  It features zucchini, which I've been told grows profusely.  When we lived in New York's Hudson Valley, friends with gardens were always giving us zucchini so I can vouch for the truth of this.  It's easy to make, has great flavor, and can be eaten on its own or served as a side dish for everything from poached fish to grilled steak.  Yes, it's that versatile!  It's zucchini with white beans and onions.

Zucchini with White Beans and Onions
Serves 4-6

1 pound of zucchini, washed and ends trimmed.  You can also use a combination of zucchini and summer squash.
1 small to medium yellow onion, diced
1 clove of garlic, minced
1 15-ounce can of cannellini beans, drained and rinsed
2 tablespoons extra virgin olive oil
salt 
fresh ground black pepper
Italian parsley, washed and chopped for garnish (optional)

Cut the zucchini in half, lengthwise.  Then cut each half in half again so the whole zucchini is cut into quarters lengthwise.  Line the fourths up together and make a large dice at 1/2-inch to 1-inch intervals.  

Heat a 12-inch saute pan over medium heat.  Add olive oil.  Swirl around the pan and add the onion and garlic.  Saute over medium heat, stirring often, until translucent.  Add the zucchini, and a couple of pinches of salt and pepper.   Cook the mixture over medium heat for 7-10 minutes, until the zucchini is starting to soften, but still firm to the bite.  If the onions start browning too much, turn the heat down to medium low.   Add the white beans, stir to incorporate.  Cook another 2-3 minutes to warm the beans.  Season to taste with salt and pepper.  If you like, garnish with chopped parsley.  Can be served warm or at room temperature.

Nutritional awesomeness:  Zucchini is low in carbohydrates and a good source of Vitamin C and Vitamin A.  Onions are a good source of Vitamin C, Folate, and Potassium.  Cannellini beans are a good source of protein and fiber, help regulate blood sugar levels, and are an excellent source of many vitamins and minerals.  
​
4 Comments

Roasted Green Beans & Chickpeas with Fig Vinaigrette

8/15/2016

0 Comments

 
Picture

The Monday before last, I boarded a Southwest flight from Sacramento to Burbank armed with two pounds of fresh figs and two jars of homemade fig jam thanks to my friend Emily.  You may have noticed it is fig season.  Brian and I welcome it with banners and open arms and a ticker tape parade, such is our adoration and obsession with figs.

Emily and I have been friends for 32 years, having met in elementary school.  We haven't lived in the same town since we were twelve.  In fact, this year is the first time in 23 years that we are living in the same state.  I went up for the weekend to celebrate her sister's baby shower and to meet a friend's newborn.  It was a glorious weekend of good friends and good food.  If you follow me on Instagram, you'll know it is also where I learned to saber a bottle of sparkling wine.  

That good food included a roasted bean salad with a plum marmalade vinaigrette at a restaurant in Sebastopol.  It was so good I couldn't stop thinking about it.  Usually, I am fretting about where my next meal is coming from.  In this case, I was fretting about when I could eat this glorious combination of beans, chickpeas and toasted pecans again.  Within a week of arriving home, I recreated the salad which I am so happy to share with you!  One of the best parts of the salad is the vinaigrette which I made using Emily's homemade fig preserves.  Whoa yum!

If you have ever disliked green beans or think the only way to prepare them is to open a can of them and drown them in Ranch dressing, try this recipe.  You won't be disappointed!

Roasted Green Beans & Chickpeas in Fig Vinaigrette
Serves 4-5

1 pound green beans, washed and trimmed
1 15.5-ounce can of chickpeas (garbanzo beans), drained and rinsed
2 tablespoons extra virgin olive oil
1/2 teaspoon freshly ground black pepper
1 teaspoon sea salt (or Kosher)
1/4 cup chopped pecans, toasted
2 tablespoons fig preserves (apricot, plum, or apple jams/jellies are all fine substitutes)*
1 tablespoon good quality balsamic vinegar (use apple cider vinegar if you are using apricot or apple preserves)
1 1/2 tablespoons extra virgin olive oil

*Look for something with low to no added sugar or sweetened only with fruit juice.  Do not use any jams or jellies that contain sugar substitutes as it will ruin the flavor of the dish.  
​

Preheat oven to 425 F.

In a large bowl, toss together the green beans, chickpeas, olive oil, salt and pepper.  Spread the beans on a rimmed half sheet pan (also called a large jelly roll pan - 16.75 x 12 inch).  You may need to use two baking sheets.  Roast in the oven for 20 minutes.

In the meantime, make the fig vinaigrette.  Whisk together the preserves and the vinegar.  While whisking, slowly add the olive oil.  Set aside.

After the beans have roasted for 20 minutes, pull the pan out of the oven.  Sprinkle the pecans over the beans and roast an additional 5 minutes.

When the beans have finished roasting, remove them from the oven and place the bean mixture in a large bowl.  Pour the fig vinaigrette over it and toss to coat.  Serve immediately.

​Nutritional awesomeness:  Green beans are a very good source of fiber, vitamins A & C plus K, folate, and manganese.  Folate is instrumental in DNA repair.  Chickpeas (garbanzo beans) are also a good source of folate and manganese as well as Vitamin B6.  Manganese supports bone health and collagen production.

0 Comments

Grilled Zucchini with Tahini Sauce

7/18/2016

0 Comments

 
Picture
I've been told by people who garden and know how to garden well, that zucchini can grow profusely.  That it just keeps coming and coming and coming.  That you will always have more than you need.  That a person with too much zucchini will exhaust all available options for dispensing of it from making muffins and soups and roasting it to just giving it away.

The seemingly endless supply of zucchini is indeed a good thing because it leads to creativity and exploration, like this grilled zucchini recipe.  It is inspired by one I found in the Zahav: A World of Israeli Cooking cookbook, which I recently checked out from our terrific local library.  As an aside, a great way to test drive a cookbook is to check it out from the library.  The recipe caught my eye because it was so different from any other preparation of zucchini I've tried.  It had a tahini sauce on it, and I like tahini (you can find my tahini salad dressing here).  It included texture in the form of toasted nuts.  

However, the recipe also had some disadvantages as far as I was concerned.  It involved turning on the oven in the summertime to roast the zucchini.  It involved multiple pieces of equipment, including a food processor, which just seemed like extra time spent washing dishes to me.  Who has time for that?  Plus the nuts it calls for are hazelnuts.  I love hazelnuts.  I do not love toasting them and then skinning them (always a messy endeavor).  

With that, I decided I could use the recipe for inspiration, adapt it to be fast and easy with a minimal amount of equipment and a maximum amount of flavor!

Grilled Zucchini with Tahini Sauce
Serves 4-5

3 - 4 zucchini, thickly sliced lengthwise
Olive Oil
Sea Salt and Pepper
1/4 cup tahini (not tahini sauce)
Juice of 1/2 lemon (if it's a huge lemon, use 1/4 and then add more lemon juice to taste)
1/2 - 1 tablespoon anchovy paste (it's your preference how much you add).
1-2 tablespoons water (may need more)
1/4 cup pine nuts, toasted

Preheat grill to medium.

Once you have sliced the zucchini, brush it with olive oil, and sprinkle with salt and pepper.

In a small bowl, stir together the tahini, the lemon juice, and 1/2 tablespoon anchovy paste.  It will thicken to the point of seizing.  Add one tablespoon of water.  Stir slowly to incorporate, avoiding splashing the water out of the bowl.  If the sauce is still too thick, add another tablespoon of water.  You may even need more water.  You want the sauce to be the consistency of salad dressing.  Taste it.  If it needs more salt and a little more personality, add more anchovy paste.

​Turn the grill heat down to low.  Grill the zucchini for 2-3 minutes per side.  

To serve:  drizzle the sauce on the zucchini and sprinkle with pine nuts.

Serving suggestion:  The original recipe calls for feta and you could certainly sprinkle feta over the zucchini after it's sauced but before you sprinkle the nuts.

Make it Vegan:  Eliminate the anchovy paste and add 1/2 to 1 teaspoon of salt to the sauce, to taste.

Nutritional awesomeness:  Zucchini is a good source of dietary fiber, vitamin C, folate and niacin.  Tahini has no cholesterol, and is a good source of thiamin, magnesium and zinc.  Thiamine is a B vitamin that assists in the healthy functioning of the nervous and cardiovascular systems.  Pine nuts are an excellent source of manganese, which is essential for good bone structure.  


0 Comments

Avocado & Grapefruit Salad

1/7/2016

0 Comments

 
Picture
My love for avocados runs deep.  I usually eat one-half to a whole avocado each day.  I put them on my eggs in the morning, my salad at night, and everything in between.  In 7th grade, I befriended a girl for the simple reason that we both liked to eat avocados with salt on them for an after school snack.  It turns out that was about the only thing we had in common, and eventually our mutual love of avocados could no longer be the tie that bound us together.

I spent the holidays with my in-laws in Texas.  My need for green food at nearly every meal made me the de facto salad chef for the holidays.  I loved it!  I had fun introducing Brian's family to some of my favorite salads.  One night, my brother-in-law, David, made some terrific grilled cilantro shrimp.  I knew not just any salad would do and so I came up with this avocado and grapefruit salad which takes advantage of what is in season and utilized the cilantro found in the shrimp recipe (I hate throwing out fresh herbs).   It's citrus season, and Texas has some refreshing specimens called Sweet Scarletts.  They are not too bitter and are perfect to add to salads.

I have high standards for salads, and this one meets all of them.  It must be delicious with a pleasing ratio of bitter to sweet to sour to salty.  The textures must be a lot of fun, and between the crunch of the nuts the pop of the citrus and smoothness of the avocados, this salad delivers.  It must visually pleasing to the diner as this one is with its pink and green hues.  This salad is one that can be served on a weeknight or for a special occasion - it's that versatile!  Enjoy!

Avocado & Grapefruit Salad with Cilantro Lime Vinaigrette
Serves 4

Spring Mix

2 ripe Hass avocados

1 large Sweet Scarlett grapefruit or other sweet grapefruit variety

4 tablespoons pepitas / pumpkin seeds, roasted and salted

1/4 - 1/3 cup fresh cilantro, chopped

1/4 cup fresh lime juice

2 - 3 tablespoons honey

1/2 cup olive oil

Pinch of sea salt

Put a large handful (or more!) of spring mix in each of four salad bowls.  

Cut each avocado in half, remove the pit, and scoop out the flesh with a large spoon onto a cutting board.  Slice each avocado half into thin slices, and then place on top of each of the bowls of spring mix.  There should be one sliced avocado half for each bowl of spring mix.

Peel the grapefruit, removing as much of the white, bitter pith as possible.  Slice the grapefruit so that you have large circles and then cut each circle in half.  Place 1/4 of the grapefruit slices on each bowl of spring mix.  

Sprinkle each salad with one tablespoon of pepitas.  

Make the dressing:  Combine the cilantro, lime juice, honey, olive oil and salt in a small bowl.  Whisk to emulsify.  Taste.  If it's too sour or bitter, add a little more honey.  Drizzle 2-3 tablespoons of the dressing over each salad and serve.  

​Nutritional awesomeness:  Avocados are a good source of healthy monounsaturated fat, fiber, potassium and folate.  Avocados contain over 20 vitamins and minerals.  Grapefruit is a very good source of dietary fiber, Vitamin C and Vitamin A.  Vitamin C boosts the immune system.  Pepitas are a good source of Protein, Vitamin K and Iron, and a very good source of Magnesium.  Vitamin K regulates blood clotting and helps transport calcium in the body.  Lime juice is a very good source of Vitamin C and a good source of Potassium. Potassium helps regulate blood pressure, among other benefits.  Olive oil contains MUFAs, a healthy fat that can protect against heart disease.  

0 Comments

Because Pumpkin Soup

11/6/2015

0 Comments

 
Picture
On my recent trip to Florence, Italy, after my long night and day of travel to get there, I was greeted by this amazing salad and a delicious pumpkin soup with white beans, courtesy of my friend Kate.  It was the the first of many pumpkin soups I enjoyed on our trip as October is a very popular time for pumpkin everything in northern Italy.  One version from Macafame in Verona had roasted slices of pumpkin in the soup that were slightly caramelized.  Another version was pureed with red lentils.   All were exceedingly delicious and memorable.

During the flights home, which involved flying from Venice to Istanbul (two hours in the wrong direction) and Istanbul to Los Angeles (over 13 hours in the right direction), Brian, my husband, developed a case of the sniffles.  When he woke up the next morning in his own bed in California, he felt worse, and this, I felt, called for soup!  I wanted to make pumpkin soup but between jet lag, a sick husband, and a dog who needed to come home from boarding, it had to be fairly easy to make using ingredients I had on hand.

The pumpkin soups I experienced in Italy stayed with me.  They were delicious, full of flavor, and the essence of pumpkin. Their soups involved roasting sugar pumpkins and scooping out the flesh.  My version is decidedly less time consuming but no less flavorful.   It mostly relies on pantry ingredients.  This soup can easily be served for a weeknight meal with a salad to make a heartwarming meal.  The use of pancetta is a nod to Brian as it's one of his favorite ingredients.  However, this versatile soup can easily be made vegetarian or vegan by omitting the pancetta.

Pumpkin Soup with White Beans
Serves 4-5

Vegetarians/Vegans:  Skip step one and omit the pancetta.  Proceed to step two, using 2 tablespoons of olive oil to coat the pan for sauteeing the diced onion.  Substitute vegetable broth for the chicken broth.

2 ounces cubed pancetta

1-2 tablespoons extra virgin olive oil

1 large yellow onion, diced

Pinch of sea salt or more to taste

1 1/2 tablespoons maple syrup (I prefer grade B for better flavor)

1/2 teaspoon ground sage

1 15-ounce can cannelli beans, drained and rinsed

1 15-ounce can organic pumpkin puree (do not use pumpkin pie filling!)

11/2 to 2 cups chicken broth

Sea salt and freshly ground black pepper

1.  In a 4-5 quart pot, brown the pancetta over medium heat.  Removed with a slotted spoon to a plate lined with a paper towel and pat dry.

2.  Add the olive oil to the pot still on medium heat until it shimmers and then add the diced onion and a pinch of salt.  Stir to coat the onion.  Lightly caramelize the onion, stirring occasionally to keep it from burning.  If it seems like it is becoming too dark, turn the heat down and add a little of the broth.  Caramelizing the onions will take 7-10 minutes.  As they turn light brown, add the maple syrup and the sage and stir to coat.  

3.  Add the beans, the pumpkin puree, and the broth.  Stir to combine.   Simmer over medium low heat for 7-10 minutes.  If it seems too thick to your liking, add more broth.  Stir in the pancetta.   Heat one more minute.  Taste the soup, and, if necessary, add salt and freshly ground black pepper.  Serve.

Nutritional awesomeness:  Pumpkin is, "low in Saturated Fat, and very low in Cholesterol and Sodium. It is also a good source of Vitamin E (Alpha Tocopherol), Thiamin, Niacin, Vitamin B6, Folate, Iron, Magnesium and Phosphorus, and a very good source of Dietary Fiber, Vitamin A, Vitamin C, Riboflavin, Potassium, Copper and Manganese, " (source).  White beans are an excellent source of fiber, protein, and iron.  They are a very good source of calcium.  


​

0 Comments
<<Previous

    Author

    Hi friends!  I am Molly.  Welcome to my blog where I share my creations and adventures to help you create a life you love.  I am passionate about food, travel, and health! Thanks for stopping by and looking around.  All photos are taken by me unless otherwise attributed.  I develop and write all my recipes with attribution for inspiration and ideas where applicable.  All of my recipes are gluten free.  

    Archives

    August 2021
    June 2021
    April 2021
    March 2021
    December 2020
    November 2020
    October 2020
    June 2020
    May 2020
    April 2020
    February 2020
    January 2020
    December 2019
    September 2019
    August 2019
    July 2019
    May 2019
    April 2019
    March 2019
    February 2019
    January 2019
    November 2018
    October 2018
    September 2018
    August 2018
    July 2018
    June 2018
    May 2018
    April 2018
    February 2018
    January 2018
    December 2017
    October 2017
    September 2017
    August 2017
    July 2017
    June 2017
    May 2017
    April 2017
    March 2017
    February 2017
    September 2016
    August 2016
    July 2016
    June 2016
    May 2016
    April 2016
    March 2016
    February 2016
    January 2016
    December 2015
    November 2015
    October 2015
    September 2015
    August 2015
    July 2015
    June 2015
    May 2015
    April 2015
    March 2015
    February 2015
    January 2015

    Categories

    All
    Breakfast
    Dessert
    Dinner
    Exercise & Fitness
    Gluten Free
    Healthy Living
    Healthy Snacks
    Healthy Travel
    Quick
    Recipes
    Side Dishes
    Skin Care
    Sugar Addiction
    Vegan
    Web Wellness Wednesdays
    Women's Health

    RSS Feed

    Subscribe to our mailing list

    * indicates required
    Your data is used in line with our privacy policy.
Health Coaching
Classes
Contact
FAQ
Terms and Conditions
​Disclaimer
Privacy Policy
© COPYRIGHT Molly B Duncan.
​ ALL RIGHTS RESERVED.
Photos used under Creative Commons from Brett Jordan, roseannadana