Let's connect!
Molly B Duncan Health Coach
  • Home
  • About
  • Health Coaching
    • FAQ's
    • Testimonials
  • Classes
  • Blog
  • Contact
  • FAVORITES

Easy Recipes for Thanksgiving

11/19/2020

1 Comment

 
Picture
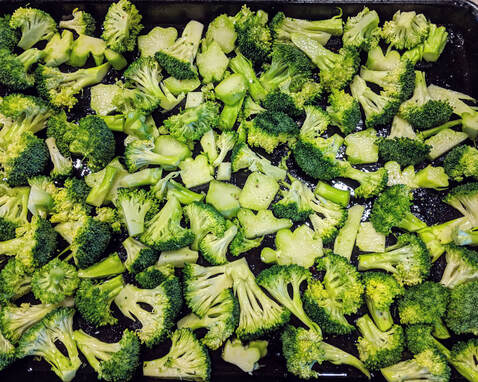
A pan of broccoli about to be roasted.
Like a lot of Americans we are having a very small Thanksgiving celebration this year with just my husband and me and two dogs.  We can't bring ourselves to have anything bigger or to travel when it feels like that would be so disrespectful to the health care workers who are on the front lines of this pandemic. I've been reading their stories, and it's all so heartbreaking.  Also, we don't want to get sick and we don't want to die. 

I have some Thanksgiving recipes to share with you to help make your holiday delicious.  I loathe difficult recipes, especially ones with hard to find ingredients that use every pan and utensil in my kitchen so the recipes shared here are easy!

If a whole turkey will be way too much food for you this year, consider turkey thighs.  We'll be having this as our main course!  Also, we had it as our main course last year!  

If turkey does not excite you or you just don't feel like having it, I invite you to consider serving an easy roast chicken with root vegetables.  Even if you don't have this for Thanksgiving, save this recipe for winter because it's satisfying during the cold months.  

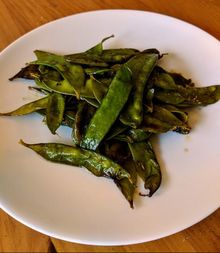
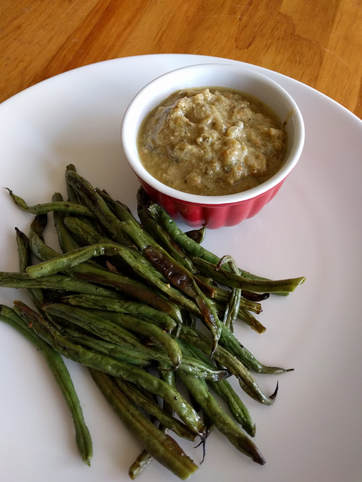
Let's talk about side dishes.  By far and away, the best side dish recipe I have developed over the years is this one: Roasted Green Beans with Chickpeas and Fig Vinaigrette.  It has great crunch from pecans, it has both tart and sweet notes from the vinaigrette, and, frankly, it's lick-the-plate good.  If chickpeas don't interest you, just omit them.  

My friend Kathryn reminded me the other day that my husband, Brian, makes the best Roasted Broccoli.  It's another easy and delicious recipe that deserves space on your holiday table.  

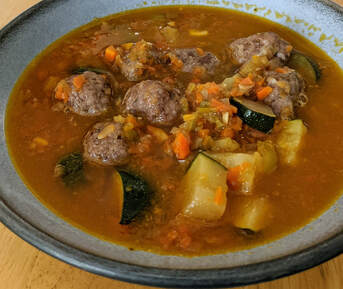
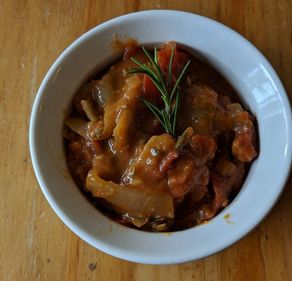
How about soup?  A lovely way to start your Thanksgiving meal would be with this Pumpkin Soup, which I created after sampling many delicious versions on a trip to Italy some years ago.  It's Italian so it must be good!

Since Thanksgiving foods tend to be rich, a salad to cut through the fat and cleanse the palette is recommended.  It's the beginning of citrus and avocado season so this Avocado & Grapefruit Salad is appropriate.  

While all the recipes mentioned above have been personally developed by me, there are a couple of holiday standards we have on the table every year.  I always make the Barefoot Contessa's Cranberry Conserve which is loaded with citrus, nuts, and apples.  I modify her recipe to make it the best cranberry sauce ever!  It has an obscene amount of sugar in the original recipe, 1 3/4 cups of sugar.  I reduce it to one cup of sugar, and it turns out sweet enough without feeling like you are having dessert in the middle of dinner.  

For Thanksgiving dessert last year, I made a pumpkin cheesecake, and, honestly, I regret it, save for the bourbon pecan caramel sauce.  It took so much time.  Plus the water bath failed so there I was blow drying a soggy cheesecake.  We haven't quite settled on a dessert for our holiday meal this year.  I am lobbying heavily for this Pumpkin Cake with cream cheese frosting.  

Wherever you are this year and however you choose to celebrate, I hope we will all do the right thing and celebrate Thanksgiving only with immediate family.  It's a small sacrifice to make to ensure that we can be with our families next year during the holidays.  
​

1 Comment

Clean Out The Fridge Soup

4/8/2020

8 Comments

 
Picture
The other night I posted on my Instagram stories that I was making clean out the fridge soup and it seemed to resonate with people.  This is likely because we're all cooking more due to sheltering in place.  And because we are all cooking more, most of us probably have some leftover veggies wandering around the bottom of the fridge.  Wasting food is never a good idea, but especially not right now when so many people, from farm workers to grocery store employees, are risking their lives to make sure we all have food to eat.  That's where this soup comes in.  It makes use of what's laying about in your fridge.  It's easy.  It's delicious.  And frankly it's more of a formula than a recipe.  As it is a formula, I've broken this down into the base of the soup, the veggies, and the extras.  I hope you make it because it's very nourishing and that's something we could all use now.

Clean Out The Fridge Soup
Serves 4-6

Base:
  • Fat: Please use olive oil.  Thank you.
  • Salt: We have a salt grinder filled with coarse sea salt.  It's less salty than table salt.
  • Black Pepper:  If you can, always use freshly ground black pepper.
  • Spices: Red pepper flakes.  This is personal preference so you can use whatever spices you have to season the soup to make it delicious.  I tend towards less is more.  
  • Onion: whatever you have on hand is fine.  In this soup I used one yellow onion plus three scallions.
  • Garlic: I used four cloves, but this is personal preference.
  • Carrots: I used three medium-sized carrots that we had lying about in the crisper drawer.
  • Celery: I used two stalks of celery.  Whatever you have on hand is fine.  Be sure to use the stalks and the leaves as the leaves add flavor.
  • Broth or water: Use 6 cups of chicken broth or vegetable broth or a combination of broth and water.  Again, we're cleaning out the fridge so use what you have.
  • Base extra: tomato paste or white wine to deglaze the pan before adding the other ingredients.   

Veggies:
  • Honestly, use whatever veggies you have on hand that are headed towards past their prime and haven't been assigned to a particular meal.  In this soup I used two zucchini rolling around the crisper drawer.  This is a good time to use spinach, swiss chard, kale, any squash, peppers, tomatoes, etc.

Extras:
  • Cheese: If you have a Parmesan rind in the fridge, toss it in the soup as it will add a lot of flavor.  Alternatively, you could grate some Parmesan or Pecorino on the soup at the table.
  • Meat: You can tell in the photo above that I added meatballs.  We had some ground pork in the fridge so I rolled it into very tiny meatballs made with just some garlic, salt, and pepper.  You could throw in leftover chicken, Italian sausage, ground turkey or beef, cubed ham, bacon.  Again, use what you have in the fridge that needs to be used so it won't be wasted.
  • Herbs:  If you have thyme, throw a couple of sprigs in.  Some rosemary leaves might be nice.  Garnishing the soup with some chopped parsley at the end will add a touch of color and might even go so far as to remind you of dining in a restaurant.  

Method:
  1. Chop the onion, garlic, celery, and carrot.  
  2. In a 4-quart or larger soup pot or stock pot, heat about three tablespoons of olive oil over medium heat.  Stir in the chopped onion, garlic, celery, and carrot to the pot.  Add a pinch or more of red pepper flakes, 1 teaspoon of salt, and many grinds of black pepper.  Cook until the onion is starting to brown, stirring occasionally to prevent the garlic from burning.  If the pan is looking dry, by all means add another bit of olive oil as it is what an Italian grandmother would do.  
  3. If you are using tomato paste, add 2 to 4 tablespoons (1/4 cup), and stir it around the pan both to mix it with the onions and to cook it.  Cook the tomato paste for one minute. 
  4. If you are using wine, add up to 1/2 cup and stir it around the pan to deglaze it and scrape the brown bits off the bottom of the pot.  
  5. Add the broth or broth-water and stir to combine.  Scrape the bottom of the pan to incorporate the brown bits into the soup.  The bits have a lot of flavor.  Chop any vegetables you are adding, such a squash or a tomato, spinach or chard, and then add them to the soup.  If you are using thyme or rosemary, add them now.  Also, this is the time to add a Parmesan cheese rind if you are using that.  Turn the heat down to low or simmer and put a lid on the pot.
  6. While the soup simmers, this is the time to prepare your meat.  If it's already cooked, then chop it or shred it, whatever is most appropriate.  If the meat needs to be cooked, do that now.  Once the meat is cooked and in bite-sized pieces, add it to the soup. Simmer for an additional five to 10 minutes.  Taste the soup.  What does it need?  It might need some salt.  If it tastes flat, a splash of red wine vinegar or some lemon juice (~2 tablespoons) can brighten it.
  7. Ladle the soup in bowls, and garnish with parsley if you have it.  Serve hot.  

​

8 Comments

Roasted Cauliflower Rice

4/17/2019

0 Comments

 
Picture

"What do you do to keep the riced cauliflower from tasting like a slightly solid form of boiled water?"  This is a message from my friend Marci after she read my recipe for Spring Vegetable Mishmash.  I've been swapping out cauliflower rice for regular rice recently as I have evidence that consuming rice too often has led to some recent autoimmune flare-ups.  Cauliflower rice is also popular with people who follow a Whole30 or a Paleo diet or an autoimmune protocol.   I definitely feel better after eating cauliflower rice versus eating traditional rice.  

However, Marci's question brought up a good point and that is cauliflower rice can sometimes taste like just a bunch of wet styrofoam pebbles.  Frankly, food should taste good, especially healthy food.  Through trial and error, I have found that roasting cauliflower rice produces the most flavor.  It's an easy cooking method and takes as much or less time to make as traditional rice.  

Here are the ingredients for it, if you are not starting with a whole head of cauliflower, plus what it looks like spread in the pan:

Picture
Picture
Roasted Cauliflower Rice
Serves 3-4

One large head of cauliflower or 16-ounces of riced cauliflower
2 Tablespoons of grapeseed oil, avocado oil, or coconut oil (melted)

Preheat your oven to 425 F.  Brush a baking sheet with the oil.  

If you are using a whole head of cauliflower, wash it, cut off the lower stem and all leaves.  Cut it into eight parts. Place in the bowl of a food processor with the blade attachment. Pulse 10 times for 5-10 seconds until the cauliflower is reduced to very small chunks.  

Spread the cauliflower on the prepared baking sheet.  Bake for 10 minutes. Remove from the oven.  Stir the cauliflower so the bits browning on the edges are well incorporated back into the middle.  Spread so the cauliflower is evenly distributed.  Bake for another 10 minutes or so until some of the cauliflower is becoming golden brown. You’ll notice that roasting the cauliflower rice has caused it to shrink.  

Use as a base for any dish that calls for rice.  

Nutritional awesomeness: A half cup of cooked cauliflower is an excellent source of Vitamin C, even after accounting for Vitamin C loss during the cooking process (source).  For a better understanding of how the cooking process can alter the nutrient content of fruits and vegetables click here.
0 Comments

Spring Vegetable Mishmash, a recipe

3/29/2019

0 Comments

 
Picture

Can you have too many mishmashes?  I know I posted this salmon one last month, but I am finding a medley of ingredients both comforting and healthy.  The other night I made this using vegetables that are finally appearing in the market as we transition from winter to spring: fresh peas, arugula, and, here in southern California, even zucchini.  It has so much flavor, so much bang for the buck, so much green beauty in one meal!  Plus, it's easy.  If you've read my blog for any length of time, you know I am a big fan of ease.

The inspiration for this recipe came from this risotto recipe.  BUT risotto requires a lot of hands on attention, all that stirring and whatnot.  So I thought about how I could make something equally as delicious, equally as nutritious, and eliminate all the stirring.  That is how you have come to find yet another mishmash recipe on my blog.  It's worth it, though, so very worth it.  And if you drink wine, I can attest to the fact that a Sauvignon Blanc plays nicely with this mishmash.  


​Spring Vegetable Mishmash
Serves 4

Good quality olive oil
Salt and fresh ground black pepper
1 small yellow onion or 2 shallots, finely chopped
3-4 cloves of garlic, peeled and minced
1 to 1.5 pounds of zucchini, washed, ends trimmed, cut into a large 1-inch pieces
1 cup of fresh (or frozen peas)
3 to 4 cups of arugula or spinach, washed and chopped
2 cups of cooked white rice, brown rice, or cauliflower rice
Juice of 1/2 lemon
Salt and freshly ground pepper
Feta or Parmesan cheese, optional
Pine nuts, toasted, optional

In a 12-inch skillet or sauté pan, cook the onions and garlic in two tablespoons of olive oil over medium heat until the onion is translucent, about five minutes or so.  Add the zucchini and cook until nearly tender.  Stir infrequently so that the zucchini has a chance to become light golden brown on the outside.  Cooking the zucchini will take a good 10-15 minutes.  When the zucchini are crisp tender (in other words, not mushy), add the peas and the arugula or spinach.  Cook until the arugula is wilted and peas and just cooked through, another five minutes or so.

In the meantime, heat your cooked rice or cauliflower rice.  Once the veggies are done cooking, put 1/3 cup to 1/2 cup of rice in the bottom of a shallow bowls, top with a spoonful of veggies, season with salt and pepper to taste, and add a sprinkle of any toppings you desire.  

Make it vegan: Eliminate the cheese.  

​Play with the veggies: Instead of 1.5 pounds of zucchini do 1/2 pound of asparagus cut into one-inch lengths and one-pound of zucchini.  Add the asparagus to the pan at the same time as the zucchini and continue to follow the directions.
 

Nutritional awesomeness: Zucchini has a lot of nutritional benefits, which you can read about here.  It's a good source of Vitamin A and potassium (source).   Arugula is an excellent source of Vitamin K, which is essential for proper blood clotting. 

​

0 Comments

Tomato Provençal Compote

6/28/2018

4 Comments

 
Picture
I recently taught my last cooking class for the foreseeable future.   The Get Saucy class came about because I noticed my friends and family commenting on the sauces we make at home and how complicated they seemed.  The thing is, sauces can be so easy and are such a great way to bump up the flavor of anything from roasted vegetables to grilled chicken.   Here's what I know to be true for me: cooking at home is a great way to control what you eat and support your health and vitality.  Sauces are an integral part of home cooking.  To me, there are two sauce methods.  One method is the "beat the heck out of it" method.  Pesto falls into this category.  Just put all the ingredients into the food processor and beat the heck of out it (apologies to Italian grandmothers who use a mortal and pestle).  The other method is the "cook the heck out of it" method.  Tomato Provençal Compote falls into this category.  While it takes a while to cook, the preparation is easy, and, therefore, it feels accessible to everyone, no matter your level of cooking ability.  

This recipe is inspired by a Barefoot Contessa recipe for roasted lamb.  We made it once when Brian's parents were visiting for Christmas and everyone raved about how the tomatoes that were roasted with the lamb disintegrated into a magical concoction that had me licking my plate in front of my in-laws.  Perhaps not my proudest moment, and I love to eat.  

As I have lots of friends who are vegan and vegetarian and wanted to share the sauce with them, I created my own recipe for Tomato Provençal Compote that anyone can enjoy.  And as it is summer and tomato season is upon us, now is the time to enjoy this delicious recipe, which can be served cold or warm, with meats or veggies or on bread.  It's not bad eaten with a large spoon right out of the container standing in front of an open fridge!

​Molly’s Tomato Provençal Compote
Makes ~ 1 pint or a little more

¼ cup of extra virgin olive oil
1 large Spanish onion, sliced
2 pounds of fresh tomatoes, seeded and diced
5 cloves of garlic, peeled and chopped
3 Tablespoons of Dijon mustard
1 ½ Tablespoons of balsamic vinegar
½ teaspoon of honey
Leaves from two to three sprigs of thyme
Leaves from one sprig of rosemary
Salt and freshly ground pepper to taste

Heat the olive oil in a large saucepan (at least 3 quart saucepan).  Add the onions and saute over medium heat until they are starting to turn light brown.  While the onions cook, chop the thyme and rosemary leaves together. In a bowl, combine the garlic, mustard, vinegar, honey, and chopped herbs.

When the onions start to change color, add the tomatoes, a couple of pinches of salt and a couple of cracks of black pepper.  If anything is sticking to the bottom of the pan, deglaze it with one tablespoon or two of water, and then add another drizzle of olive oil.  Stir the tomatoes and onions a bit. When the tomatoes are starting to break down, add the mustard herb mixture and stir to combine. Continue to cook over medium low heat for 15 minutes.  If there’s still a lot of liquid in the pan, turn up the heat to evaporate it while stirring to keep the compote from sticking to the bottom of the pan. The compote should be fairly thick, like a stew.  Season with salt and pepper to taste and serve.

Storage:  Can be stored up to one week in the refrigerator or frozen for up to three months.

Serving ideas:  Excellent with grilled meats, served over white beans, slathered on grilled toast, or eaten out of the jar with a spoon.

​Nutritional awesomeness:  Cooked tomatoes are an excellent source of Vitamin C and a good source of Vitamin A.  They have a low glycemic load.  

4 Comments

A Delicious, Nutritious Two-Ingredient Snack

4/18/2018

0 Comments

 
Picture

My current favorite snack is just two ingredients: dates and cashew butter.  That's it.  I discovered it in January when I chose to temporarily eliminate some foods from my diet so that my body could feel better.  Sure I enjoyed the sugar-laden desserts of the holidays and too much wine.  But between the overindulgence of the holidays and recovering from my second miscarriage, which happened in November, by January my body was asking, no it was begging for a break. 

I don't diet.  I don't cleanse or detox.  I do try to eat in a way that helps me thrive while living with an autoimmune disease.  I was diagnosed with Grave's Disease in February 1998.  For twenty years I have managed to live with one disease without developing another.  Research has shown that once you develop one autoimmune disease, you are much more likely to develop another.  One doctor told me I was 600 times more likely than someone who does not have autoimmunity.  

So in January, I eliminated some inflammatory foods, giving my body a chance to heal.  Out went dairy and alcohol and soy and legumes and sugar.   I am a snacker by nature and snacks were a real challenge until I happened upon this flavorful and nutritious combination of dates smeared with cashew butter.  The sweetness of the dates plus the creaminess of the cashew butter is incredibly delicious and incredibly satisfying.

Can I call this a recipe?  It feels more like a method so here is the method for this snack followed by the nutritional awesomeness it provides.

Dates with Cashew Butter
Serves 1

2 Medjool dates or 3 smaller dates such as Bahri or Deglet Noor
Cashew Butter

Remove the pit from the date and spread it flat.  Smear it with cashew butter.  Yum!

If you like dates, check out my recipe for date balls.  

Nutritional awesomeness:  Dates are loaded with anti-oxidants and other good for you vitamins and minerals, are considered low glycemic, and have a reputation for being the Viagra of Saudi Arabia (ahem and bada bing bada boom!).  If you want more information about the health benefits of dates, check out this article, and this one, and also this one.  The fat in cashew butter aids digestion.  You can read about the benefits of cashew butter here.  

​You can learn more about dates in this article.  

It's your turn!  What are some of your favorite two ingredient snacks?

0 Comments

Roasted Snow Peas with Maple Soy Glaze

2/27/2018

0 Comments

 
Picture

Roasted Snow Peas.  Perhaps you are already roasting your snow peas, but we certainly were not.  Historically, when snow peas were on the menu, Brian would haul out his beloved wok and stir fry them which is a quick cooking method with a not so quick clean-up method. 

So the other night when both of us arrived home tired, one from sailing and the other from working, we wanted a quick dinner.  We had salmon fillets in the freezer and snow peas in the fridge so the menu was easy.  We would do the Maple Soy Salmon recipe from Julia Turshen's wonderfully useful cookbook Small Victories.  Brian would stir fry the snow peas.  Add our usual green salad and two glasses of wine and there's dinner.

Except I didn't want to stir fry the snow peas.  I just wanted to throw everything in the oven.  We always have leftover glaze from the Maple Soy Salmon recipe so I suggested that we toss the snow peas with the leftover glaze and roast them in the oven at the same time as the salmon.  One cooking method.  No standing over a hot stove.  Easy clean up of two sheet pans.  YES!

And it turns out that roasted snow peas are delicious!  And quick!  And easy! And nutritious!

Roasted Snow Peas with Maple Soy Glaze
Serves 4

1 lb. snow peas, cleaned with ends trimmed
1 Tablespoon low-sodium soy sauce or gluten free tamari
1 Tablespoon pure maple syrup (feel free to omit)
1 Tablespoon extra virgin olive oil
1/2 to 1 teaspoon ground ginger, depending on your preference.
Salt and pepper to taste

Preheat oven to 425 F.  

Toss all the ingredients together and spread evenly on a sheet pan (13 x 18 inches).  Roast for 12-14 minutes, rotating the pan 180 degrees halfway through cooking.  Serve hot or cold or room temperature as they are delicious at any temperature.  Sprinkle with salt and pepper to taste.  Pairs especially well with roasted salmon. 

Nutritional awesomeness:  Snow peas have got a lot of goodness.  They are a good source of Vitamin A and Vitamin K.  As Vitamins A and K are fat soluble vitamins, the olive oil in the recipe helps your body absorb them.

0 Comments

An Easy, Spicy Sauce to Make Dinner Delicious

8/16/2017

1 Comment

 
Picture

Have you heard of pipian sauce?  It is one of the many sauces that Brian and I use to have a flavorful dinner without spending a lot of time and money in the process.  Traditionally, pipian sauce is made of tomatillos, onions, cilantro, sugar (ugh, why?), sesame or pumpkin seeds, and toasted bread.  You can find it in Mexico and Central American countries.  I do love a lot of flavor in my foods, and I do not love a lot of time spent for that flavor.   I imagine that done correctly, this sauce is a lot of work.  Luckily, I found a recipe for it in Rick Bayless' wonderful cookbook, Mexican Everyday, which was pretty straightforward.  Then, we did what we do often, we made it even easier and removed unnecessary ingredients, like sugar.  Rick Bayless recommends serving with with salmon and so do we.  It's great with grilled salmon.  The fat and the sweetness of the fish are cut with the spice and acidity of the sauce.  I also enjoy pipian sauce on eggs, grilled chicken, and I imagine it would be good with grilled pork.  Hey, vegetarian and vegan friends, it makes a nice dipping sauce for roasted cauliflower or green beans.  When thinking about pairing it, the sauce is spicy so it's ideal with something sweet.

How did we make this recipe our own?  Rick calls for blending the primary ingredient, a tomatillo salsa, in a food processor.  We are not doing that.  Why?  Because I am the dishwasher and heck no I will not be washing any unnecessary dishes thank you kindly.  This is just to make the sauce smooth.  I'm fine with it chunky.  We eliminated the sugar because geez louise why do you need sugar in it?  You don't.  He adds ingredients one at a time to the saucepan, such as first reducing the salsa before adding the broth and tahini.  How much time do you have?  That's what I thought:  you don't have time to be adding ingredients one at a time.  Your time is valuable!  Thus, we just pour all three ingredients in the saucepan at once, and let it reduce, thereby freeing us up to make salads, roast veggies, and grill fish or chicken.  

Quick & Easy Green Pipian Sauce
Makes enough sauce for 4-6 meals

2 cups jarred tomatillo salsa (use your favorite since it's the dominant flavor of the sauce)
1 cup low sodium chicken or vegetable broth
3 tablespoons tahini that has been well stirred
​Swirl of olive oil

In a 2-quart saucepan over medium heat, lightly swirl olive oil around the pan one time.  Lift the pan and tilt it to ensure even distribution of the olive oil.  Add the salsa, broth, and tahini.  Whisk together.  It may look like the tahini has separated a bit.  This is normal and it will come together as it reduces.  Bring to a boil.  Reduce heat to medium low.  Stir or whisk occasionally to prevent the sauce from scorching on the bottom of the pan.  Cook the sauce until it has reduced by half to two-thirds, depending on your preferred thickness.  Serve warm with grilled or roasted chicken, fish, and/or vegetables.  

Nutritional awesomeness:  Tomatillo salsa is an excellent source of vitamin C.  Tahini contains iron and calcium.  

1 Comment

Sauteed Zucchini with White Beans and Onions

6/29/2017

4 Comments

 
Picture
Photo by Brian Johnson.
I recently taught one of my favorite cooking classes, Meal Planning for Health & Vitality.    I had a terrific group of students who asked lots of good questions.   Many of these students reminded me that sometimes the most challenging part of the meal is being creative with vegetables.   As my mother-in-law likes to say, "I'd be a vegetarian if preparing vegetables were not so much work."  

My goal is to change the misconception that creatively preparing vegetables has to be a lot of work to produce a lot of flavor.  I actively avoid recipes with too many ingredients or that require the use of every pan in the house plus some kitchen tools you don't have and didn't know exist.  I don't do precious when it comes to my food.   I do do good flavor with quick and easy preparations that can easily fit into our busy lifestyles.  

I'd like to introduce you to my new favorite side dish, or, some nights when I am teaching yoga and arrive home late, dinner.  It features zucchini, which I've been told grows profusely.  When we lived in New York's Hudson Valley, friends with gardens were always giving us zucchini so I can vouch for the truth of this.  It's easy to make, has great flavor, and can be eaten on its own or served as a side dish for everything from poached fish to grilled steak.  Yes, it's that versatile!  It's zucchini with white beans and onions.

Zucchini with White Beans and Onions
Serves 4-6

1 pound of zucchini, washed and ends trimmed.  You can also use a combination of zucchini and summer squash.
1 small to medium yellow onion, diced
1 clove of garlic, minced
1 15-ounce can of cannellini beans, drained and rinsed
2 tablespoons extra virgin olive oil
salt 
fresh ground black pepper
Italian parsley, washed and chopped for garnish (optional)

Cut the zucchini in half, lengthwise.  Then cut each half in half again so the whole zucchini is cut into quarters lengthwise.  Line the fourths up together and make a large dice at 1/2-inch to 1-inch intervals.  

Heat a 12-inch saute pan over medium heat.  Add olive oil.  Swirl around the pan and add the onion and garlic.  Saute over medium heat, stirring often, until translucent.  Add the zucchini, and a couple of pinches of salt and pepper.   Cook the mixture over medium heat for 7-10 minutes, until the zucchini is starting to soften, but still firm to the bite.  If the onions start browning too much, turn the heat down to medium low.   Add the white beans, stir to incorporate.  Cook another 2-3 minutes to warm the beans.  Season to taste with salt and pepper.  If you like, garnish with chopped parsley.  Can be served warm or at room temperature.

Nutritional awesomeness:  Zucchini is low in carbohydrates and a good source of Vitamin C and Vitamin A.  Onions are a good source of Vitamin C, Folate, and Potassium.  Cannellini beans are a good source of protein and fiber, help regulate blood sugar levels, and are an excellent source of many vitamins and minerals.  
​
4 Comments

Brian's Marinara Sauce

2/1/2017

0 Comments

 
Picture

A couple of weeks ago, I had the pleasure of teaching a cooking class about meal planning.   The day of the class I had an epiphany that meal planning is really about self esteem.  Meal planning is about your relationship to time and how you view time is often a reflection of how you value yourself and others.  I know you didn't expect an emotional deep dive around meal planning, and yet there it is.  Meal planning will save you time.  Your time is valuable because you are valuable.  If you devote yourself to it, not only will it save you time, it will also help you improve your health.  

It was a great group of ten women, who asked amazing questions, and who are committed to improving their overall health.  They inspired me!  It became obvious to me that they weren't meal planning because it wasn't clear to them that meal planning could be done with simple, delicious, and healthy recipes.  Often, there are fears that healthy equals tastes bad, requires special ingredients, and must be made on equipment you would only find in a restaurant kitchen.    Also, that recipes will take a lot of time, especially on weekdays when time can be most taxed.

I have good news!  None of this has to be true.  If you know me, then you know that I don't do precious in the kitchen, I will walk away from recipes with more than about six ingredients, and shake my fist at recipes that require me to use every pan in my house.  That's ridiculous.  I'm here to tell you that delicious, healthy, simple food can be yours on a regular basis.

To start, I am presenting you with my husband's enjoyable marinara sauce recipe that costs less than the jarred stuff, has no sugar (the jarred stuff usually does), and is simple to make.  The recipe is written by Brian.

Brian's Marinara Sauce
Serves 4-6
​
  • One 28-ounce can crushed San Marzano tomatoes 
  • Quite a lot of extra virgin olive oil.  I just drizzle it around until it looks like enough, generally coating the entire top of the tomato sauce in our copper-bottom saucepan.  1/4 to 1/3 cup.
  • Minced fresh garlic.  Five or six big cloves, more if the cloves are smaller.  
  • Chopped fresh basil.  I used about half the package from Trader Joes.  It probably would have been at least a cup full after being chopped.  Looking at it on the cutting board, it will look like too much, but the basil will wilt like spinach when added to the sauce.  
  • Dried red pepper flakes.  I put in a few shakes, maybe 1/8 to 1/4 teaspoon.  
  • No salt, no pepper.  
 
  1. Pour the can of crushed tomatoes into a saucepan and start heating it on low flame.  Really, you need to use a low flame or the bottom will burn and stick to the pan. 
  2. Pour in the olive oil and stir to emulsify.  You might be tempted to use a whisk, but you need to resist that temptation and go for something like a wood spoon.  With a whisk, the crushed tomato bits will get stuck in the whisk wires and then it'll be like stirring with the handle of a baseball bat, not very effective, and you'll have to get those tomato bits out of the whisk somehow, which will most likely result in them not being in the sauce where they belong.  So just use a spoon.  You need to stir slowly, or the oil will slosh out of the saucepan.  It's going to take some time to get it all emulsified.  Be patient.  
  3. As the sauce continues to heat, mince your garlic and chop your basil and add it to the sauce as you go.  Order and timing are not too important here.  Also add red pepper flakes to taste.  
  4. Once the sauce is at a consistent simmer, put a splatter guard over it and keep stirring occasionally until it has thickened to the consistency you like. You can make it ahead.  Like many sauces and stews, it's better the second day.  

Nutritional awesomeness:  Crushed tomatoes have a low glycemic load and are a good source of Vitamins A and C.  Fresh basil contains Vitamin K, which helps blood clot and builds strong bones.  You can read more about Vitamin K here.  Vitamin K is fat soluble so it's good there's olive oil in the sauce.   Olive oil is a monounsaturated fatty acid that has been shown to help lower bad cholesterol.  It contains polyphenols which are powerful antioxidants.  Studies in Europe have concluded that olive oil consumption helps lower blood pressure. One Greek study with 36,000 participants concluded that there is an inverse relationship between eating olive oil and rates of cancer. 
0 Comments
<<Previous

    Author

    Hi friends!  I am Molly.  Welcome to my blog where I share my creations and adventures to help you create a life you love.  I am passionate about food, travel, and health! Thanks for stopping by and looking around.  All photos are taken by me unless otherwise attributed.  I develop and write all my recipes with attribution for inspiration and ideas where applicable.  All of my recipes are gluten free.  

    Archives

    August 2021
    June 2021
    April 2021
    March 2021
    December 2020
    November 2020
    October 2020
    June 2020
    May 2020
    April 2020
    February 2020
    January 2020
    December 2019
    September 2019
    August 2019
    July 2019
    May 2019
    April 2019
    March 2019
    February 2019
    January 2019
    November 2018
    October 2018
    September 2018
    August 2018
    July 2018
    June 2018
    May 2018
    April 2018
    February 2018
    January 2018
    December 2017
    October 2017
    September 2017
    August 2017
    July 2017
    June 2017
    May 2017
    April 2017
    March 2017
    February 2017
    September 2016
    August 2016
    July 2016
    June 2016
    May 2016
    April 2016
    March 2016
    February 2016
    January 2016
    December 2015
    November 2015
    October 2015
    September 2015
    August 2015
    July 2015
    June 2015
    May 2015
    April 2015
    March 2015
    February 2015
    January 2015

    Categories

    All
    Breakfast
    Dessert
    Dinner
    Exercise & Fitness
    Gluten Free
    Healthy Living
    Healthy Snacks
    Healthy Travel
    Quick
    Recipes
    Side Dishes
    Skin Care
    Sugar Addiction
    Vegan
    Web Wellness Wednesdays
    Women's Health

    RSS Feed

    Subscribe to our mailing list

    * indicates required
    Your data is used in line with our privacy policy.
Health Coaching
Classes
Contact
FAQ
Terms and Conditions
​Disclaimer
Privacy Policy
© COPYRIGHT Molly B Duncan.
​ ALL RIGHTS RESERVED.
Photos used under Creative Commons from Brett Jordan, roseannadana