Let's connect!
Molly B Duncan Health Coach
  • Home
  • About
  • Health Coaching
    • FAQ's
    • Testimonials
  • Classes
  • Blog
  • Contact
  • FAVORITES

Last of the Season Zucchini Pesto Pasta

8/25/2021

4 Comments

 
Picture

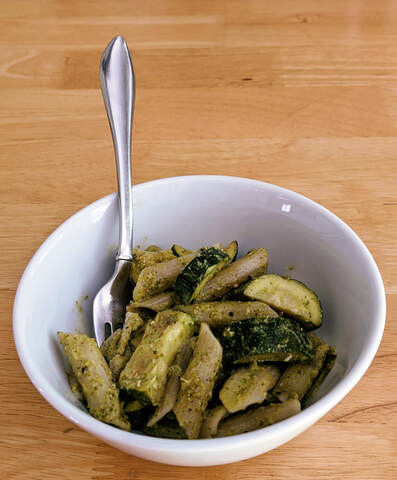
Whenever I talk to friends who garden, every single one of them, no matter where they live, mentions how plentiful zucchini are.  Some of them say they have such a bumper crop that they resort to creative tactics for unloading it on unsuspecting neighbors.  This includes loading up a bag with zucchini and leaving it hung on the front door or leaving a bag on the porch.  Should you be the lucky recipient of such vegetable abundance, fret not, because today I have a recipe that will have you rejoicing at your good fortune instead of shaking your fist saying, "Not more zucchini!"

Now this recipe is not only good if you have zucchini lying around, it's also good for hot summer days because it doesn't require you to turn on the oven.  I am grateful for this because I live in North Carolina, where, as I have mentioned before, some residents refer to the worst of summer as "Hell's Front Porch," or what I call "Satan's Sauna."

You can put as much or as little effort into this dish as you desire.  And if you are hot, or worse, hot and tired, you probably don't have a lot of energy to invest in making dinner.  You can make your own pesto or you can buy some at the store.  You can grill the zucchini*, or pan sauté it, or, depending on how much you make, roast it in a toaster oven.  You can put a cheese grater and a hunk of cheese on the table or you can buy pre-grated cheese.  I won't judge.  The important things to remember are that the recipe doesn't use the oven, it comes together quickly, it uses a lot of zucchini (if you need it to), and IT'S DELICIOUS!  Like so delicious that I don't want to share the leftovers with my husband.   So go make this dish, and oh, things come together very quickly at the end!

Zucchini Pesto Pasta
Serves 4-6

​
First, make the Pesto (or buy a jar at the store):
4 ounces fresh basil, de-stemmed, washed and dried.
⅓ cup pine nuts, toasted
⅓ cup grated Parmesan or Pecorino Romano, loosely packed in the measuring cup
½ small lemon, juiced
½ teaspoon of ground black pepper
½ teaspoon of kosher or sea salt
⅓ cup of good quality extra virgin olive oil

In a food processor, pulse the basil and pine nuts 10 times.  Add the cheese, salt, pepper, lemon and pulse to combine.  Turn on the food processor and add the olive oil slowly through the feed tube.  Taste.  If it tastes a little flat, add another squeeze of lemon juice.  Add salt and pepper to taste.  Process once more.

Storage: In a covered container in the refrigerator for up to four days or in the freezer for two months.  

Second, make the pasta and zucchini.
Water and salt for the pasta
10-12 ounces of penne pasta (or whatever pasta shape you prefer) 
4 small to medium zucchini, washed, ends trimmed, cut into large 1-inch pieces
Good quality extra virgin olive oil
Sea salt and freshly ground black pepper 

Fill a large pot 3/4 full of water (I use a 5-quart dutch oven), add 2 teaspoons of salt, and bring to a rolling boil.   

While the water is heating up, heat a skillet over medium low.  Pour in 2 tablespoons of olive oil, add the zucchini, and cook until nearly tender.  Season with salt and pepper.  Stir infrequently so that the zucchini has a chance to become light golden brown on the outside.  Cooking the zucchini will take a good 10-15 minutes.  Once the zucchini are done cooking, you may have a couple minutes left on the pasta, so reduce the heat under the zucchini to low until ready to put it in the final pasta dish.  

Cook the pasta according to the manufacturer's directions.  And here's where I tell you that I always cook it 30 seconds less than that for perfectly al dente pasta.  VERY IMPORTANT: 1 to 2 minutes before the pasta is finished cooking, reserve some pasta water by ladling a cup or two of pasta water into a heat proof measuring cup with a pour spout.  


While the pasta and the zucchini are cooking, prepare for everything that happens right at the end.  Put a colander in the sink.  Have olive oil nearby.  Near the end of cooking the pasta reserve some of the cooking water.

Once the pasta has reached desired doneness, it's go time!  Drain the pasta into the colander.  Pour a tablespoon or two of the good olive oil back into the pot and swirl the pot to cover the bottom.  Then add the pasta, and stir to coat it with olive oil.  Put the pot back on the stove over very low heat.  We're done cooking the pasta so the heat is just to keep it warm.  Next add the pesto and stir so that all the pasta is covered. 

Now, the magic happens.  Add a little bit of the pasta water, no more than 1/4 cup, to the pot, and stir to create a creamy pesto sauce.  If it's too thick, add a little more pasta water, stir, and determine if you need more.  When the sauce is coating each piece of pasta, and it looks good to you, stop adding water.  Add the zucchini and stir to combine.  Let's eat.

I recommend serving this in shallow bowls and passing cheese at the table.

* If you choose to grill the zucchini, follow the instructions in this recipe, but skip the tahini sauce.  When the zucchini is done, cut it into small bite-size pieces, and add it to the pasta after the pasta has been coated with the pesto sauce.  
​

4 Comments

The Big Summer Salad

6/15/2021

2 Comments

 
Picture

When it is hot and humid and sticky outside -- what more than one neighbor here in North Carolina has referred to as "Hell's Front Porch" -- the last thing we want to eat is something hot and heavy.  Instead, we opt quite often for a very big salad.  It's quick, it's delicious, and it's satisfying.

The Big Summer Salad has its origins in summer visits to see my mom when she was living in Denver.  She'd pick me up at the airport and we would head straight to the Cherry Creek Grill to split a Macho Salad and a dessert.  That salad showed me that a glorious dinner salad has protein and fun textures (crunchy nuts) and something creamy plus lots of vibrant colors.  And a surprise.  A good salad can become great with an element of surprise.  In the case of the Macho Salad, the surprise was chopped dates.  And I don't mean the sugar-coated, pre-packaged dates.  I mean the real fruit from a palm tree somewhere in the California desert.  

I've played with the formula to create my own salad, what I call The Big Summer Salad.  And I am presenting a recipe for it here.  But this is more than a recipe.  This is an invitation for you to play with your food and come up with your own version of The Big Summer Salad.  What flavors speak to you?  What textures make eating fun and pleasurable for you?  What colors do you want on the plate so it's a joy to the eye?

We always eat The Big Summer Salad with a vinaigrette made of 1/3 cup good quality aged balsamic vinegar and 3/4 cup good quality extra virgin olive oil mixed in this cruet.  We keep the flavor of the dressing simple so the salad ingredients can shine.   This salad is a good repository for leftover chicken or even leftover grilled shrimp.  If you've got a random carrot rolling around in the vegetable drawer, then grate it and toss it in.  If you love cheese, well so does this salad.  I tend to skip it, but my husband loves topping his with goat cheese.  Again, this salad is really flexible.  Consider all amounts listed in the recipe below as suggestions.

The Big Summer Salad
Serves 4 and can easily be doubled to feed more

8 ounces spring mix
2 cups of cooked chicken, shredded or protein of your choice
1 pint of ripe cherry tomatoes, either halved or quartered
1 cup or so of thinly sliced cucumber
1 cup of diced celery
2/3 cup fresh dates (I like Medjool), pitted and chopped
1 large or 2 small avocados, peeled, pitted, and thinly sliced

Optional add-ons:
  • Cheese, either grated, crumbled, or sliced with a vegetable peeler
  • Nuts (I like toasted sliced or slivered almonds)
  • Chopped cooked bacon
  • Whatever sounds, looks, and tastes good to you.  It's your salad!
​
For each salad, place a huge handful of spring mix on a dinner plate.  Next, sprinkle the chicken over followed by the tomatoes, cucumber, and dates.  At this point, add any of the optional items.  Very last, top with the avocado slices.  Drizzle the dressing over the salad.  Hot tip: use a steak knife and fork to cut up the salad, and enjoy!

2 Comments

5 Tools I Used to Survive Surgery during the Pandemic

4/22/2021

2 Comments

 
PictureView from my hospital bed.

Y'all, I had to have major surgery during the pandemic!  And when I first heard that from my doctor I was shocked, and then I became terrified.  I am sharing my story because the tools I used to navigate having a hysterectomy during this challenging time are helpful in a variety of situations.   

I wanted to have a positive experience with this surgery.  My anxiety wanted me to worry about everything.  But that emotional toll can cause physical problems, and I knew from experience that having my body in good physical shape would help me recover more quickly and wholly.   

I created a healthy toolkit for myself just for this surgery.  This is the work I do with health coaching clients in which I help them create a healthy toolkit so they have a system in place that helps them achieve their health goals.

​Here is what I put in my surgery healthy toolkit:
Hired a psychotherapist.  Have you met my anxiety?  She can be useful for some stuff.  In general, though, she tends to worry all the time about all the things.  For example, on trips she'll try to convince me that the pilot is drunk and the plane has mechanical problems.  I knew going into surgery that having a good mindset would be essential to the success of my recovery.  And it worked!  Collaborating with a therapist helped so much that the morning of surgery I was so calm that I fell asleep while in the prep room before being wheeled into the operating room and before receiving anesthesia.  Wow!

Eliminated recreational sugar and alcohol.  Years ago, before I was diagnosed with celiac disease, I had chronic foot warts.  It turns out that those warts were a result of eating wheat.  I know this is a tangent, but bear with me.  There are a lot of food allergies, intolerances, and autoimmune diseases that people think they don't have because they believe the only symptoms of these maladies are digestive distress.  This, frankly, is not a true story.  I know celiacs who had no symptoms before their diagnosis and only got tested because a family member had been diagnosed with the disease.  My celiac symptoms were foot warts and respiratory distress.  So I spent a lot of time getting to know my podiatrist.  And he introduced me to the concept of inflammatory foods.  He required all his surgical patients to eliminate sugar and alcohol weeks before surgery so they would have less pain and recover faster.  And it worked!  His nurse told me that his patients always had the best results.  I have had this tool in my back pocket ever since and I definitely employed it recently.  I walked away from alcohol last May because it was making my body feel crummy most of the time.  Since then, I had have a sip of Brian's wine at dinner sometimes just to see how it pairs with the food.  And I enjoyed a class of prosecco on New Year's Eve.  Net, this one was easy as I stopped having an occasional sip of Brian's dinner wine.  To eliminate recreational sugar, I stopped baking, stopped eating my beloved daily piece(s) of dark chocolate, and stayed away from snacking on marshmallows.  I was told it would take at least two weeks after my hysterectomy before I started to feel better.  I feel like I hit that mark at 10 days post-surgery.  In fact, I keep forgetting to take my pain meds because, well, the pain has diminished greatly.  Staying away from foods that inflame pain helps!

Went for daily walks.​  And when I say I walk, I do not mean with the dogs or with other humans.  I went on walks specifically for me.  I went on walks through nature and noticed flowers.  I went on fast walks and short walks and long walks.  I went up and down hills.  The only rule was that these walks were for me and me alone.  Walking is a standard item in my healthy toolkit.  It's how I process my thoughts.  It's part of how I stave off depression and anxiety.  And I did a walk for me almost every day during the month before my surgery.  It meant that my body was in good shape and my heart was healthy going into surgery.

Prioritized sleep.  One of the biggest sources of inflammation in the body is lack of good sleep (source).  For years, sleep has been in my healthy toolkit.  I get good sleep by not keeping a TV or my phone in the bedroom, having a bedtime routine that prepares my body for sleep, and by establishing boundaries around my sleep to protect it.  In the past, when I haven't consistently gotten 7.5 to 8 hours of sleep, my autoimmune diseases will flare up, my depression will set in, brain fog will creep in, etc.  Preparing for this surgery was no different as I prioritized 8 hours of sleep each night in the month before surgery.  It helped immensely.  And now, as I recover, I am resting when my body wants to rest, and I am sleeping somewhere between 8 and 12 hours each night.  It's essential for a full recovery.

Got by with a little help from my friends.  I have a treasure trove of friends and so many of them gave me some great advice prior to surgery from aligning expectations about the experience to what it's like to cough while nursing an abdominal incision (the worst pain ever!).  They sent cards and flowers and soup and coloring books and books and checked in with text messages and emails and phone calls.  All that love and support has been essential to my recovery.  We live in an area with few friends and no family (we moved here right before the pandemic began), and my husband has really stepped up to take care of me during my convalescence.  Knowing I have a partner who is there for me has been so helpful to my recovery.  

To recap, here's what I put in my healthy toolkit for my surgery:
  • Psychotherapy
  • Eliminated sugar and alcohol
  • Daily walks just for me
  • Sleep
  • Friends

Hey, if reading this made you want to create your own healthy toolkit, contact me for a complimentary call to see if health coaching is a good fit for you! 
​

2 Comments

Lemony Shrimp Pasta with White Beans

3/31/2021

0 Comments

 
Picture
​Note: this post contains affiliate links.

When the weather turns warm, my food desires change.  Instead of heavy stews, I crave lighter dishes, like this shrimp pasta.  It's a mainstay in our house from spring through fall, and sometimes in winter because we often have the ingredients on hand.  It's a fairly simple dish full of fresh flavor from sweet shrimp to a hit of lemon with parsley for color and a vegetal note.  If you love garlic, you can put in a lot.  And if you find garlic can be overpowering, then just put in a little.  It's up to you.  Make this dish your own.  Use a good olive oil as it's the base of your sauce, along with some reserved pasta water.  If your olive oil is rancid or has some off-flavors, your sauce may not taste very good.    Regarding the shrimp, you can absolutely buy pre-cooked shrimp.  If you buy raw shrimp, choose a cooking method you find easy and season the shrimp only with salt and pepper.  Our preferred cooking method is grilled.  If we are using frozen shrimp and the weather is not good for grilling, we'll boil the shrimp in 4 cups of water and save the water to make soup or risotto later.   As someone living with celiac disease, I am super picky about my gluten free pasta.  Currently, 
Jovial is my favorite brand.  My husband even prefers it over wheat pasta because the flavor is so good.  

​Lemony Shrimp Pasta with White Beans
Serves 4

6 ounces regular or gluten free pasta 
1 tablespoon salt

1 pound large shrimp, shelled, deveined, and cooked 
3-4 tablespoons extra virgin olive oil
3-6 cloves of garlic, minced

1/4 - 1/2 teaspoon red pepper flakes
1 15-ounce can cannellini or Great Northern white beans, drained and rinsed

Zest of one lemon
Juice of 1 1/2 lemons
1/3 cup fresh parsley, chopped fine
Extra virgin olive oil
Sea salt and freshly cracked black pepper to taste
​
  1. If you haven't cooked the shrimp, do that first.  
  2. Fill a 4-quart or larger pot 3/4 full of water and stir in the tablespoon salt.  Set over high heat, covered, and bring to a boil.
  3. While the water is heating, cut your cooked shrimp into bite-size pieces and set aside.
  4. In a shallow 10-inch or larger skillet add the olive oil, garlic, and red pepper flakes.  Then turn on the heat to low to let the flavors meld and to ensure you won't burn the garlic.  
  5. Once the water is boiling, add the pasta and cook for 30 seconds less than the package calls for.  This helps ensure you will have al dente pasta.
  6. Add the shrimp and beans to the garlic mixture and continue cooking over low heat.  Add a pinch of salt and a couple of grinds of black pepper.  Stir to combine.  We don't actually want to cook the shrimp any further.  We do want to warm the shrimp and beans.
  7. While the pasta is cooking, have nearby a ladle and a heatproof 2-cup liquid measure cup.  Ninety seconds before the pasta is finished cooking, reserve at least one cup of the pasta water.  It is starchy from the pasta and is the base of your sauce.  
  8. When the timer goes off, taste one piece of pasta.  You want it to be chewy, not crunchy, and just shy of al dente.  Why? Because the pasta gets cooked a little bit more.  Drain the pasta.  In the pot you cooked the pasta, add some olive oil and swirl it to coat the bottom of the pot.  Add the pasta back to the pot and set over low heat.
  9. Add the shrimp-bean mixture to the pot, a couple of tablespoons of pasta water, the lemon juice, the lemon zest, and the parsley.  Stir to combine.  Keep stirring gently until the sauce thickens a bit.  It's magical how pasta water transforms from watery to a sauce that nicely coats each piece of pasta.  This part may take a minute or two so be patient.  And you may need a little more pasta water if the sauce becomes too thick.  Only add one tablespoon of pasta water between stirring sessions to avoid a watery mess.  
  10. Serve warm in shallow bowls.  Feel free to pass around some grated pecorino on the side if you'd like.  
​
0 Comments

Gluten-Free Cornbread Stuffing

12/17/2020

0 Comments

 
Picture

I cried during Thanksgiving dinner.  Those who know me well will not find this terribly unusual.  I really feel all my feelings.  But this year, I cried over stuffing, and not because it was bad.  I cried because it was so, so good!  And also because when I went gluten free in 2013 I thought my days of eating stuffing at Thanksgiving dinner were over.  I hadn't eaten stuffing in nearly a decade.  To be truthful, rarely do Brian and I make a traditional meal at Thanksgiving.  We've eaten paella, various roasts, and last year we enjoyed a butternut squash lasagna.  The lasagna was so rich we are still recovering from it!  The stuffing I made for Thanksgiving was not made from gluten free bread because frankly so much of gluten free bread resembles styrofoam peanuts that have been pulverized and are being held together by air only to crumble when you take a bite.  Here we have a benefit of moving to the South: cornbread!  Many cornbread recipes call for a combination of cornmeal and wheat flour.  Traditionally, though, cornbread was made with just cornmeal.  And we happen to have locally milled cornmeal.  This stuffing requires you to make traditional cornbread one day and then the stuffing the next day.  It's worth it, and honestly, it's pretty easy.  The most difficult part is planning your time.

NOTE: Bake the cornbread the day before you plan to make the stuffing.

Gluten Free Cornbread Stuffing
Serves 6-8 

Cornbread:
1 1/2 cups cornmeal
1 teaspoon salt
1/2 teaspoon baking soda
1 large egg
1 cup buttermilk
1/4 cup high quality grapeseed or canola oil

Stuffing:
1 8-inch square pan of baked cornbread (using above recipe)
2-3 tablespoons of extra virgin olive oil
1 large yellow onion, not sweet, peeled and chopped
5 stalks of celery, with leaves on if you can find it this way, chopped
1 4-ounce package of diced pancetta, optional
2 tablespoons fresh or 1 1/2 tablespoons dried thyme leaves
4-5 fresh sage leaves, finely chopped, or 1 teaspoon (or more) dried sage
1 teaspoon sea salt or kosher salt
1 teaspoon (or more to taste) freshly ground black pepper
2 cups unsalted chicken broth (bonus points for you if it's homemade)
2 eggs, beaten
1/3-1/2 cup fresh Italian parsley, finely chopped
1 cup toasted pecan pieces, optional
  1. Make the cornbread.  Preheat the oven to 400 F.  Grease an 8-inch square baking pan.  In a large bowl, whisk together all the dry ingredients.  In a smaller bowl or wide-mouth pitcher, whisk together the wet ingredients.  Pour the wet ingredients into the dry and stir until well combined.  Pour into the greased baking pan.  Bake for 20-25 minutes until it is golden brown and starting to pull away from the sides of the pan.  Let cool in the pan.  Cover and let sit overnight.
  2. Make the stuffing.  Preheat your oven to 375 F.  Grease a 9x13 baking pan.  Heat a large skillet over medium heat.  Add the olive oil and swirl it around.  Add the onions, celery, and, if using it, the pancetta.  Cook until the onions are translucent, stirring often.  Once the vegetables have softened, add the thyme, sage, salt and black pepper.  Cook for another two minutes.  Turn off the heat and let the vegetables cool a bit.
  3. While the vegetables are cooling, crumble the cornbread into a large bowl.  Stir in the stock, eggs, parsley, and, if using them, the pecans.  Place the stuffing into your greased 9x13 pan.  Bake for 30-33 minutes, until it's light golden brown on top and starting to brown around the edges.  Let cool for 5 minutes and serve.  
Make it vegetarian: omit the pancetta and use vegetable broth instead of chicken broth.  

0 Comments

2020 Gift Guide

11/30/2020

2 Comments

 
This post contains affiliate links.
​

Picture
I rarely publish a gift guide, but this year I felt compelled to do so because so many small businesses could really use our money, whereas Amazon is going to be just fine.  In addition to small businesses, I also thought about businesses that are focused on improving the world.  And I thought about products I've been using every day that might benefit you!  So here is my in-no-particular-order gift guide for your consideration.  Also, some of these stores are having great Cyber Monday sales, including Beautycounter and The Sill!

Houseplants.  Last year one of my best friends in the whole word suffered a terrible carbon monoxide scare at a rental home over Thanksgiving.  For Christmas, I sent her a Snake Plant which helps purify the air and also thrives on neglect.   I only give houseplants that don't need a lot of care.  The two I love and the only two I have in my house are Snake Plants and Zz Plants.   If you lived in Greensboro, which most of you don't, I would tell you to get a Snake Plant at The Tiny Greenhouse, which is where I get all my houseplants.  However, a good online source of houseplants is The Sill.  Another option would be to purchase houseplants from a locally owned nursery in your area.  Small businesses could use our support anytime, but especially this year.

Lip gloss.  My favorite lip gloss, and one that would make a great gift is Beautycounter's Beyond Gloss.  It's moisturizing, not sticky, comes in a lot of flattering colors, does not leak, and has a pleasant vanilla scent.  And the color lasts.  I can put some on before leading a two hour seminar on Zoom or teaching a yoga class, and it's still looking good hours later.  I could write a lot about lip gloss because I wear it all the time and I am super picky about it.  Since I have celiac, it absolutely has to be gluten free.  Since I teach about health, I only choose clean beauty products that don't have unsafe chemicals, questionable colorants, etc.  Honestly, we swallow a lot of lipstick and lip gloss in our lifetime (source) so it's important to make sure our lip products are safe.  Beautycounter has a lot of awesome products and today only (11/30/20) they are offering 15% off plus free shipping over $50!

Books.  I recently read that our depressed economy has heavily hit independent bookstores, with more than one permanently closing every month since the pandemic started.  Amazon does not need more money, but boy, local bookstores sure could use the help.  I did a lot of my holiday shopping at Scuppernong here in Greensboro.  In Colorado, it was always a special treat growing up to visit The Tattered Cover in Denver (confession: I always wanted to be a gift wrapper there but alas I lacked the skills).  On vacation in California's Central Coast, Brian and I would always go to Coalesce Bookstore in Morro Bay, which carries Brian's favorite genre of adventures at sea.   Click here to find an independent bookstore in your area.  And feel free in the Comments to give a shout out to your favorite independent bookstore.  Thanks!

​Flowers.  I have a confession.  I have been buying a $3.99 bouquet of flowers at Trader Joe's every two weeks since we moved to North Carolina.  They absolutely brighten my day and my foyer.  If you use the plant food provided and trim them after one week, they really do last two weeks.  That's cheaper than a cup of Starbucks coffee for two weeks of visual joy!  You can find economically priced small vases at Goodwill and Michael's.  A great gift for neighbors, especially if you are unsure if they have food allergies, is to pop one of those Trader Joe's bouquets in a vase.  This is also good for teachers and such.  We've had a lot of people move into our neighborhood in the past year and so I've been welcoming folks with one of these bouquets.  Funny enough, one neighbor brought the vase back with new flowers in it and so now we exchange flowers once a month.

Jewelry, Art, Crafts.  For this category of gifts, seek out local gift shops that carry the work of local artists.  Artists have been especially hard hit this year because all the trade shows and holiday fairs where they sell their products have been cancelled.  In Greensboro, I did a lot of holiday shopping at Just Be.  Also, on Etsy, you can not only search by the product you want but also by geographic location, which is how my husband found someone who was making face masks locally.  

There you have it.  Some great gift ideas for the holidays and beyond.  I'd love to hear in the Comments your gift ideas and small businesses you recommend.

2 Comments

Easy Recipes for Thanksgiving

11/19/2020

1 Comment

 
Picture
A pan of broccoli about to be roasted.
Like a lot of Americans we are having a very small Thanksgiving celebration this year with just my husband and me and two dogs.  We can't bring ourselves to have anything bigger or to travel when it feels like that would be so disrespectful to the health care workers who are on the front lines of this pandemic. I've been reading their stories, and it's all so heartbreaking.  Also, we don't want to get sick and we don't want to die. 

I have some Thanksgiving recipes to share with you to help make your holiday delicious.  I loathe difficult recipes, especially ones with hard to find ingredients that use every pan and utensil in my kitchen so the recipes shared here are easy!

If a whole turkey will be way too much food for you this year, consider turkey thighs.  We'll be having this as our main course!  Also, we had it as our main course last year!  

If turkey does not excite you or you just don't feel like having it, I invite you to consider serving an easy roast chicken with root vegetables.  Even if you don't have this for Thanksgiving, save this recipe for winter because it's satisfying during the cold months.  

Let's talk about side dishes.  By far and away, the best side dish recipe I have developed over the years is this one: Roasted Green Beans with Chickpeas and Fig Vinaigrette.  It has great crunch from pecans, it has both tart and sweet notes from the vinaigrette, and, frankly, it's lick-the-plate good.  If chickpeas don't interest you, just omit them.  

My friend Kathryn reminded me the other day that my husband, Brian, makes the best Roasted Broccoli.  It's another easy and delicious recipe that deserves space on your holiday table.  

How about soup?  A lovely way to start your Thanksgiving meal would be with this Pumpkin Soup, which I created after sampling many delicious versions on a trip to Italy some years ago.  It's Italian so it must be good!

Since Thanksgiving foods tend to be rich, a salad to cut through the fat and cleanse the palette is recommended.  It's the beginning of citrus and avocado season so this Avocado & Grapefruit Salad is appropriate.  

While all the recipes mentioned above have been personally developed by me, there are a couple of holiday standards we have on the table every year.  I always make the Barefoot Contessa's Cranberry Conserve which is loaded with citrus, nuts, and apples.  I modify her recipe to make it the best cranberry sauce ever!  It has an obscene amount of sugar in the original recipe, 1 3/4 cups of sugar.  I reduce it to one cup of sugar, and it turns out sweet enough without feeling like you are having dessert in the middle of dinner.  

For Thanksgiving dessert last year, I made a pumpkin cheesecake, and, honestly, I regret it, save for the bourbon pecan caramel sauce.  It took so much time.  Plus the water bath failed so there I was blow drying a soggy cheesecake.  We haven't quite settled on a dessert for our holiday meal this year.  I am lobbying heavily for this Pumpkin Cake with cream cheese frosting.  

Wherever you are this year and however you choose to celebrate, I hope we will all do the right thing and celebrate Thanksgiving only with immediate family.  It's a small sacrifice to make to ensure that we can be with our families next year during the holidays.  
​

1 Comment

Stuffed Acorn Squash

10/29/2020

3 Comments

 
About a month ago, we took two acorn squash on a trip.  Yes, really.  We hadn't used them the week before and we reckoned they might go bad while we were away.  With no plan for them, we brought them with us anyway.  

Growing up, I mainly experienced acorn squash as dessert for dinner.  My mom would cut the squash in half, take out the seeds, fill it with a large amount of honey plus butter and seasonings and roast it.  It was a sweet treat that my sugar addicted younger self was always eager to eat.

Now, I'm an adult and I need to be thinking about my nutritional needs and not triggering my sugar addiction.  With that in mind,  I decided to make stuffed acorn squash at the lake home we rented for a week.  It's easy to make at home and it's easy to make on vacation.  It doesn't call for any speciality ingredients or a lot of equipment, and it all comes together in an hour or a bit more.    As the weather is turning cold, stuffed acorn squash is nourishing and filling, not to mention delicious.  Try it and see for yourself!
Picture

Stuffed Acorn Squash*
Serves 4

2 acorn squash, cut in half, seeds removed
Olive oil
Sea Salt and Freshly Ground Pepper
1 onion, diced
2-4 cloves of garlic, minced
2 carrots, peeled and diced
2 celery stalks, diced
1 pound of ground meat such as turkey or pork

Preheat the oven to 400.  Rub the squash with oil and season  with salt and pepper.  Roast squash for 40 minutes on a foil lined baking sheet or in a roasting pan that will fit the squash halves.  

While the squash are roasting, prepare the filling.  Place a large sauté pan or skillet on a stovetop burner and heat to medium or medium-low.  Add 2-4 tablespoons of olive oil (or a neutral oil like grapeseed).  Once the oil starts to shimmer, add your onions.  Cook, until the onions are translucent, about five minutes or less, stirring frequently.  Add the garlic, carrots, and celery.  Stir frequently to combine and for even cooking.  Season with salt and pepper.  Let the vegetables cook for approximately 10 minutes.  Add the meat and break it up with a wooden spoon or a fork.  Stir to combine the vegetables and the meat.  Sauté until the meat is cooked through.  If the mixture is looking dry, add a couple of tablespoons of water or chicken broth.  If the vegetables are getting too dark, turn the heat down.  Once the mixture is cooked through, turn the heat to its lowest setting and stir occasionally until the squash are done roasting.  

When the squash have finished roasting, take them out of the oven.  Spoon as much filling as you can into each squash half.  You will have some extra filling that you can pass around at the table.  Once the squash are filled, return them to the oven for 10 minutes so the filling heats through.  Serve one squash half per person.

*I kept this very basic as I wasn't traveling with much more than my salt and pepper grinder.  However, there are a lot of ingredients that would bump up the flavor of the stuffed squash, including:
  • Dried sage - add one teaspoon to the filling after you have added all the vegetables but before adding the meat.
  • Dried or fresh thyme leaves - add one teaspoon to the filling after you have added all the vegetables but before adding the meat.

​

3 Comments

Take your dinners from ho-hum to yum!

6/30/2020

4 Comments

 
Picture

When I hear various objections to eating healthy or changing eating habits, one of the complaints I hear most often is that healthy food does not taste good.  Let's go ahead and eliminate that idea because frankly it's just not true.  I used to teach a cooking class called Get Saucy! which showed people that combining just a few ingredients could really boost the flavor of your meal.  Sauces are probably what your dinner is missing.  I'm not talking about fancy French sauces that require special tools or fancy techniques.  I am talking about ingredients you can find in your grocery store or that you may already have in your pantry.  And the method for making the sauce could not be simpler.  Maybe it involves a little chopping or perhaps heating on the stove, but that's it.   And when food tastes good you're more likely to eat it.

In the past, I have featured on this blog such flavorful and easy-to-make sauces as Romesco, a surprising combination of roasted red peppers and almonds that is a real crowd favorite around here.  Today I bring you another sauce which is just a handful of ingredients, thrown together and simmered on the stove.  It's not taxing to prepare it, and yet it is so flavorful.  It boosts everything from grilled chicken to roasted cauliflower.  But I'm clearly having a hard time telling you about it.  Why?  Well, it contains anchovies.  And anchovies for a lot of people are a hard sell, but in a sauce they add an addictive salty and umami element that makes you want to lick the plate!  Well, it makes me want to lick the plate.  Also, anchovies are low in mercury and a good source of omega-3 fatty acids and B vitamins.  They can be high in sodium so a little will go a long way.  

The sauce I share today is just a lot of darn good olive oil, some minced garlic, capers, and anchovies.  That's it.  I'm pretty sure the hardest part of this recipe is actually opening the can of anchovies (why?  why does it have to be so hard and dangerous?).  I hope you'll make it and give it a try, especially if you have cooking fatigue, as many of us do from sheltering in place.  One note, all measurements of ingredients, except the olive oil, are suggested.  You are free to put in more or less garlic.  My husband loves capers so I put in an obscene amount of those.  If anchovies are not your thing, or you are just unsure about them, start with one.   This sauce is super easy and super forgiving.  Also, the recipe can easily be cut in half or doubled.

Garlic Caper Anchovy Sauce
Makes approximately 2/3 cup or less

1/2 cup really good quality extra virgin olive oil
2 to 4 garlic cloves, peeled and minced
1 to 2 tablespoons capers, drained and patted dry
1 to 5 oil-packed anchovy filets

Combine all ingredients in the smallest sauce pan you have.  Place the pan over the smallest burner on your stove and turn the heat to low.  You want to simmer the sauce, and keeping the heat on low ensures you will not burn the garlic if you walk away or accidentally check email for 30 minutes.  Over low heat, it's really hard to screw up this sauce.  Stir it every once in a while because you want the anchovies to mostly, if not completely, dissolve in the sauce.  

How to serve: In a bowl passed at the table so people can choose their own amounts.  We like it drizzled over roast fish, grilled chicken, roasted cauliflower, or baked fingerling potatoes.   Enjoy!

4 Comments

Four Tips to Help You Plan Meals!

5/29/2020

2 Comments

 
Picture

One of the main reasons to meal plan during this pandemic is that it will eliminate excess trips to the grocery store.  When every trip means possible exposure to COVID-19, going to the store as little as possible makes good sense. ​I've been posting my meal plans on my Facebook page these past couple of months hoping people find them helpful, that people are inspired to do their own meal planning, and that they see it can be done fairly easily.  Meal planning is one of the main tools I use to thrive while living with three autoimmune diseases (yes, three!).  It helps me focus on those foods that are most nutritious for my body and stay away from foods likely to cause autoimmune flare-ups.  Flare-ups for me look like exhaustion, joint pain, and brain fog.  

To create a new habit, you need to prioritize it.  And this leads to tip #1: schedule time to meal plan.  Sit down with your calendar and a weather forecast (for grilling) and determine what you will have each night of the week.  Tip #2: write your meal plan down in a place where you are likely to see it.  We use a notebook that we keep on the kitchen counter.  Some people I know meal plan on their phone and set up reminders to do it.  Once you have that done, then write your grocery list based on your meal plan.

If meal planning is a new habit you are creating, you want to set yourself up to succeed.  Tip #3: keep it simple so that the habit is more likely to stick.  What do I mean?  Start with planning dinners using recipes you already know how to make.  Tuesday night after a long day of Zoom calls is no time to try some fancy Martha Stewart recipe that uses every pot in the kitchen.  Instead, start with what you know.  Make the more challenging recipes or ones you've never tried before on the weekends or evenings when you have more time to prepare.

​When I was a student at the Institute for Integrative Nutrition, Dr. David Katz, at the time a professor at the Yale School of Medicine and an expert in nutrition and obesity, was one of our lecturers.  I'll never forget when he said that a lot of dietary theories agree on one thing: Americans do not eat enough green vegetables.  Tip #4: focus on vegetables, especially green ones.  We include a big salad every night with dinner as our main source of greens, and I tend to eat spinach at breakfast.  There are lots of benefits to eating more green vegetables, including improved brain function and they are good for your bones.   And if you find yourself resisting and coming up with excuses, it's worth eating them to protect your health!

To recap, here are four tips to help you meal plan:
  1. ​Schedule time to meal plan.
  2. Write it down where you will see it often and remember it is there.
  3. Keep it simple so you are more likely to do it and form an awesome meal planning habit. 
  4. Focus on vegetables, especially green ones.

And there you have it.  I hope you find these tips helpful.  If you already plan your meals, what are some of your best tips?


2 Comments
<<Previous

    Author

    Hi friends!  I am Molly.  Welcome to my blog where I share my creations and adventures to help you create a life you love.  I am passionate about food, travel, and health! Thanks for stopping by and looking around.  All photos are taken by me unless otherwise attributed.  I develop and write all my recipes with attribution for inspiration and ideas where applicable.  All of my recipes are gluten free.  

    Archives

    August 2021
    June 2021
    April 2021
    March 2021
    December 2020
    November 2020
    October 2020
    June 2020
    May 2020
    April 2020
    February 2020
    January 2020
    December 2019
    September 2019
    August 2019
    July 2019
    May 2019
    April 2019
    March 2019
    February 2019
    January 2019
    November 2018
    October 2018
    September 2018
    August 2018
    July 2018
    June 2018
    May 2018
    April 2018
    February 2018
    January 2018
    December 2017
    October 2017
    September 2017
    August 2017
    July 2017
    June 2017
    May 2017
    April 2017
    March 2017
    February 2017
    September 2016
    August 2016
    July 2016
    June 2016
    May 2016
    April 2016
    March 2016
    February 2016
    January 2016
    December 2015
    November 2015
    October 2015
    September 2015
    August 2015
    July 2015
    June 2015
    May 2015
    April 2015
    March 2015
    February 2015
    January 2015

    Categories

    All
    Breakfast
    Dessert
    Dinner
    Exercise & Fitness
    Gluten Free
    Healthy Living
    Healthy Snacks
    Healthy Travel
    Quick
    Recipes
    Side Dishes
    Skin Care
    Sugar Addiction
    Vegan
    Web Wellness Wednesdays
    Women's Health

    RSS Feed

    Subscribe to our mailing list

    * indicates required
    Your data is used in line with our privacy policy.
Health Coaching
Classes
Contact
FAQ
Terms and Conditions
​Disclaimer
Privacy Policy
© COPYRIGHT Molly B Duncan.
​ ALL RIGHTS RESERVED.
Photos from Brett Jordan, roseannadana